VITReports Module Installation Guide
Introduction
VITReports Reports Module can be installed on computer that contains software from Overseer family or that connected to such system through the network.
To install VITReports it is necessary to perform the following steps:
- launch program installation and, following the installation instructions, install VITReports reports module;
- restart computer after installation accomplishment.
In this document step-by-step installation instruction for VITReports reports module is provided.
Installation Steps
Step 1. Security Warning
To start module installation run an executive .exe file, specified for running the VITReports module installation program.
- For Windows XP system run is performed by double click with left mouse button.
- For Windows 7 andWindows 8 systems click on an executive file icon with right mouse button and select Run as Administrator in an opened contextual menu. After the Open file – security warning window is displayed, click Execute to continue installation.
Step 2. Installation Language Selection
Installation wizard suggests selecting language of installation. This language specifies the language of windows that are displayed during the process of installation and the language of the reports' templates.
Installation can be performed in Russian, Ukrainian, English or Spanish languages. Reports' templates are available in Russian and English languages. After the language is selected, click Next button.
Step 3. Welcome Window
At this step window of Installation wizard with installable application name and version is displayed. To continue installation click Next button. To cancel installation and close program click Cancel button.
Step 4. License Agreement Acceptance
At this step window with license agreement is displayed.
To continue VITReports installation it is necessary to accept the license agreement. For this read the agreement, check I accept the terms of license agreement and click Next button.
Step 5. VITReports Reports Module Folder Selection
At this step it is necessary to select the destination folder for VITReports reports module installation.
It is possible to browse application installation folder or leave the default destination. To change installation folder click Browse button and select new folder in an opened window. During the installation the default destination depends on an operational system on which VITReports module is installed.
Step 6. Reports Packages Selection
At this step the one should select reports that will be used in future. As a matter of convenience reports are grouped into packages that have the same names with Overseer systems with which they can be used.
Peculiar reports types are demanded for each system, thus the following reports are available:
- for Overseer Parking without rates;
- Camps without rates;
- Parkings without rates;
- Were at the parking without rates;
- Parking without rates clients;
- for Overseer Parking with rates:
- Parkings;
- Parking clients;
- Operators;
- Debtors;
- Receipt statement;
- Debts for parking;
- Client's balance;
- Camps;
- Were at the parking;
- Stay at the parking for too long (report is available starting from 1.0.3 version).
- for Overseer Traffic.
- for Overseer Parking without rates;
Detailed information about each report is provided in VITReports Module User’s Guide”.
Step 7. DB For VITReports Selection
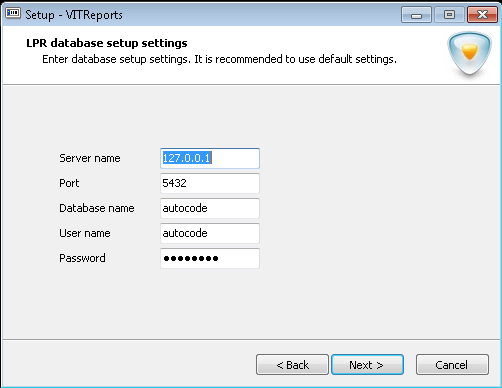
At this step it is necessary to provide details of connection to DB, which data will be used for reports generation (see picture Overseer Parking Reports Module Installation Guide. Recognition base selection):
- server name - in this field the IP-address of the server is indicated. The default setting is 127.0.0.1, meaning server is located on a local machine;
- port - in this field port of connection to data base on server is indicated. The default setting is 5432. The same setting was indicated in parameters of connection to DB during the installation of Overseer system;
- database name, user name, password - in these fields the base name, username and password for connection to the data base are indicated. Settings of these fields were specified during Overseer system installation, default setting is autocode.
In case if the specified DB does not contain schema required for reports generation, it will be created by installer. After installation parameters for connection to DB can be changed in Settings option of VITReports reports module.
Step 8. Installation Parameters Confirmation
At this step confirmation of previously specified parameters is performed. In case if data are correct click Install button and VITReports module installation will be started. If data were specified incorrectly click Cancel button to go back to the previous steps to make changes.
Step 9. Module Installation Process
At this step VITReports module installation is performed. During this the window displaying installation process status is shown.
Step 10. Module Installation Accomplishment
After installation VITReports installation wizard accomplishment window is displayed. To complete installation select Yes, restart computer now and click Finish button.
After the reboot user can start working with VITReports module.
VITReports Module Installation Guide Руководство по установке модуля отчетов для Overseer
