Users. Access settings
Users
Creating and editing data about users, and setting of their purpose level and access right level is made on the tab "Users".
It is possible to restrict access for specific operator by channels (i.e., the operator will have access only to specified observation cameras), and by the application tabs (live, events, card file, rates, statistics, configuration, restore, view the archive).
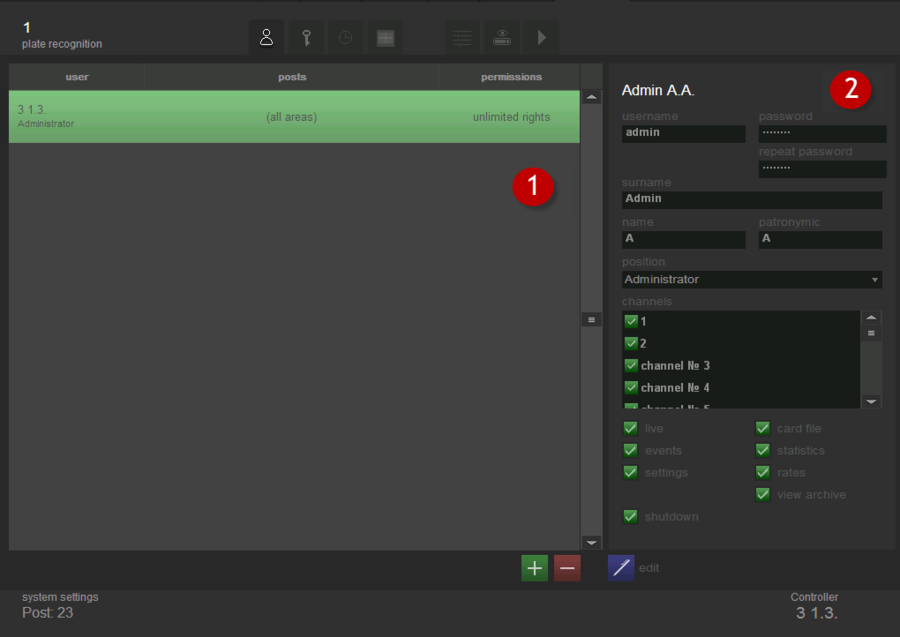
This tab is shown on fig. Users. The “Users” Tab:
Conventionally, the tab can be divided into two parts:
- the list of all users registered in the system;
- detailed information about the selected user.
The list of all users is the table where the following data can be found:
- user’s name, surname and patronymic;
- user’s position;
- posts (observation channels) to which some user has access;
- tabs and application properties to which some user has access.
To view more information about the user of the system it is necessary to select its name in the user’s table. For the selected user in the right side of the screen displays:
- username, which is used to log in the system;
- password and the password’s confirmation in encrypted form;
- name, surname and patronymic of particular user;
- position;
- channels to which this user has access;
- tabs to which this user has access.
Users account adding
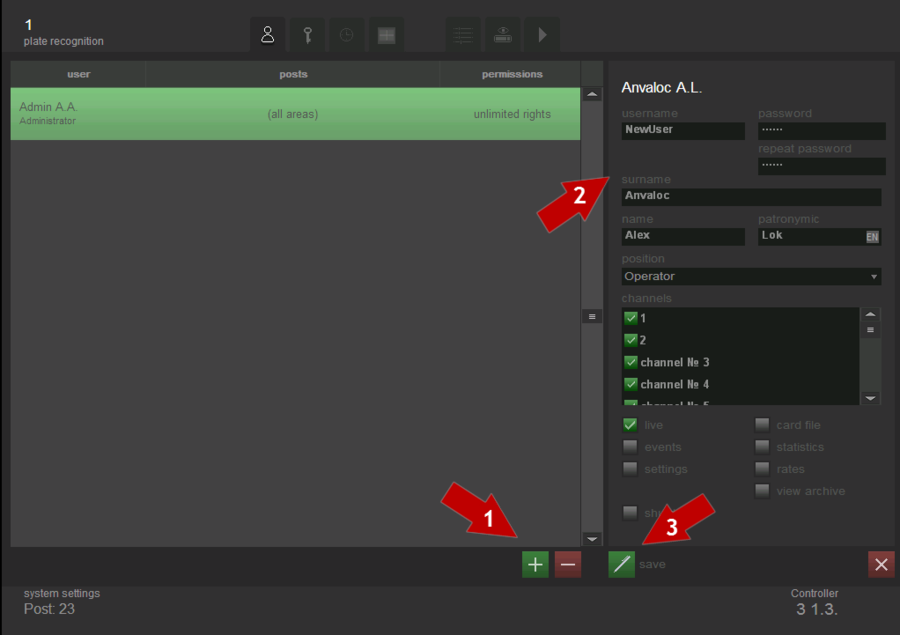
In order to add a user it’s necessary to click the button ![]() which is situated under the list of users and fill in the following fields (see fig. Users. Adding new user):
which is situated under the list of users and fill in the following fields (see fig. Users. Adding new user):
- login, which user will use to authorize to the system;
- user’s password and its confirmation in encrypted form;
- user’s name, surname and patronymic;
- user’s position – administrator, director operator;
- channels to which this user has access;
- tabs user has access.
User’s account editing
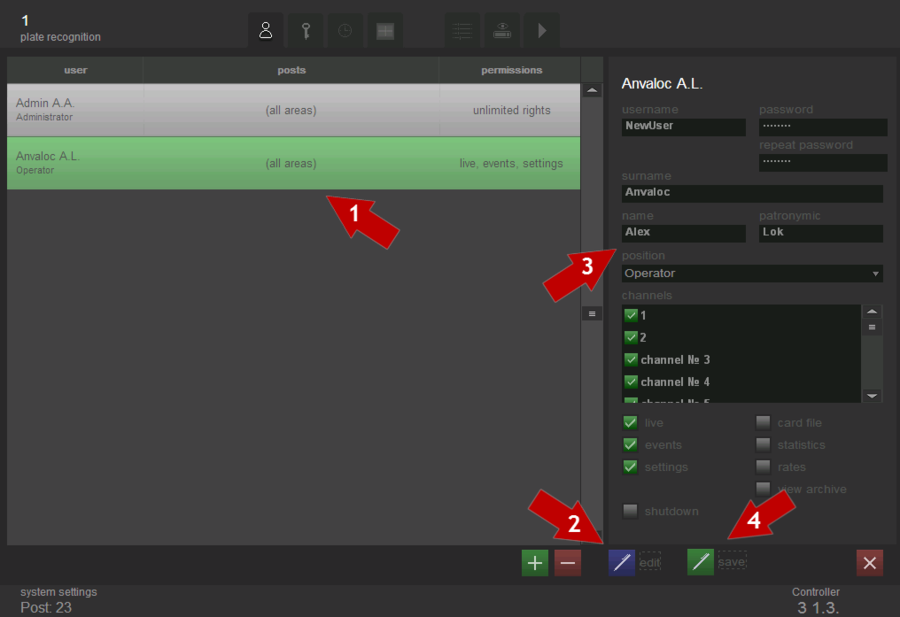
In order to edit the data about the user, it’s necessary to select him in the list of users, click the ![]() “Edit” button and change the required information (see fig. Users. Editing user):
“Edit” button and change the required information (see fig. Users. Editing user):
User’s account deleting
In order to delete a user it is necessary to select him in the users list and click button ![]() , which is situated under the list of users.
, which is situated under the list of users.
Access Settings
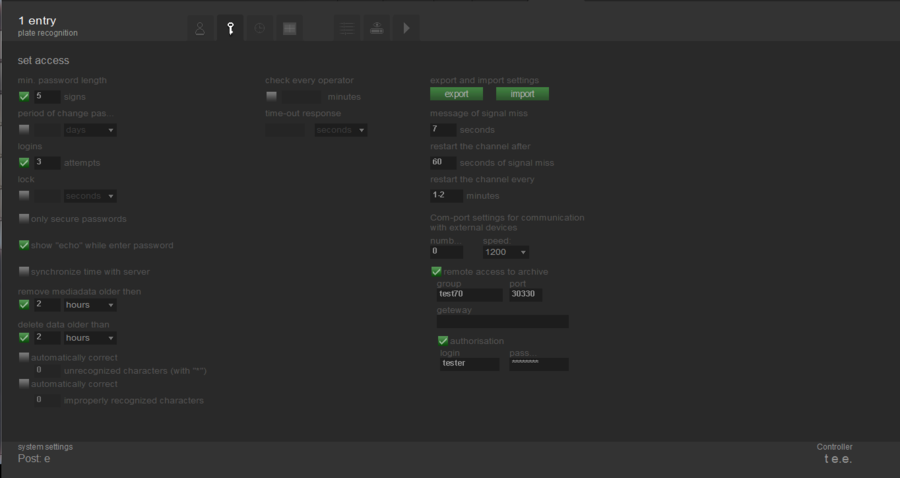
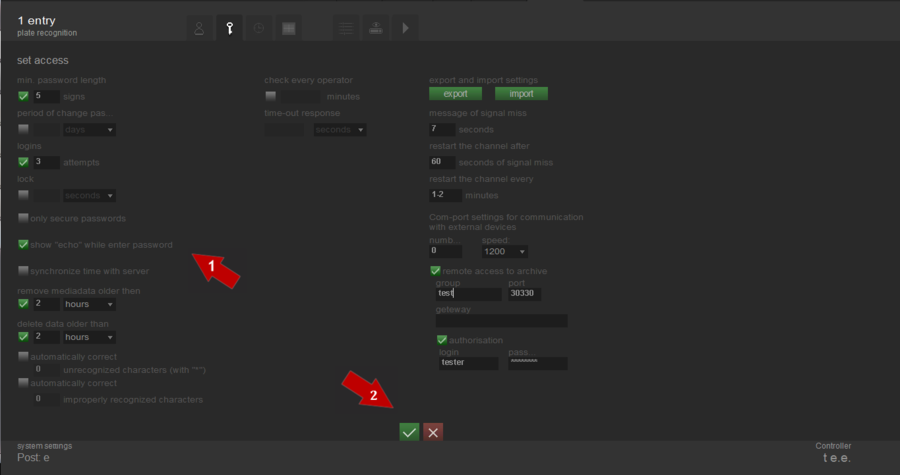
The "Access settings" tab is necessary for flexible administration of access and work of operators in the system, as well as some general application settings. This tab is shown on fig. Access settings. “Access settings” tab:
Security settings
Min. password length — limitation of user password. Recommended number of symbols is 8.
Period of password change — password storage time. User is offered to change the password after this period ends.
Login attempts — the number of attempts to enter the password. If all attempts would have been used, the account will be locked.
Lock — lockup period of the password entering.
Only secure passwords — option for turning on/off special policy for password creation. If the field is checked, password must contain both numbers and letters; if not — any password is acceptable (any keyboard layout language).
Show "echo" when typing the password – in case this option is enabled it means that entered password would be shown as "asterisk", otherwise it is not shown at all.
Server settings
Synchronize time with the server — is used for work with network version, i.e., when database is located on the remote server, application time will be synchronized with it.
Delete media data older than — is used, if space on the hard disk for storing database is limited. This option allows to delete all media resources older than the specified period (by media resources we understand images of vehicles). All other data is saved.
Delete all data older than — is used, if space on the hard disk for storing database is limited. This option allows to delete all data (both media and text) resources older than the specified period.
Recognition settings
Automatically fix unrecognized characters (number plates with "*") — enabling this option allows to compare and automatically correct plate numbers that contain unrecognized characters. The algorithm works as follows:
At the entrance, "updated" plate number:
- should not contain "*";
- search is being made in the "Card file".
At the exit, "updated" plate number:
- can contain "*";
- search is being made in the "Card file".
Automatically fix … incorrectly recognized characters. Enabled option performs the comparison and automatic replacement of plate numbers that contain incorrectly recognized symbols. Algorithm is similar to the automatic unrecognized symbols replacement.
Operator’s behavior settings
Check operator every ... minutes — launches a window, intended to check if operator is present at the workplace. This option can be realized in two different ways:
- if check time is specified as concrete number, for example, 10 minutes, operator presence is checked at fixed time intervals;
- if "-" is used (for example, 10-20 minutes) and an interval of numbers is specified, operator presence is checked within intervals with a spread, defined in the control, i.e. any variant of minutes (10, 11, 12, 13, 14, 15, 16, 17, 18, 19, 20) is acceptable, and at one of these variants, consistently not repeated, the next check will be performed.
Reaction awaiting time — time, during which the verification window is displayed to check operator presence at the workplace. If the value is not specified, the window will be displayed until the operator confirms his/her presence.
Import and export
Export and import settings. This option allows to save settings for all channels, including user identification, into a separate file, as well as to load settings from a file.
Reconnection settings
Message about absence of a signal. Example from Figure 4: if the signal from the camera is absent, operator sees the message "no signal" in the viewport of the "Live" tab in 7 seconds; after 60 seconds the system will attempt to recreate a channel (to restore a signal). In case of failure, attempts will be repeated with logarithmically increasing time intervals up to second value of “Reload channel every…” field.
Communication with external devices settings
COM-port settings for communication with external devices. Specify the port number (where the device is connected) and the speed of data transmission.
Remote access settings
Remote access – is a flag the activation of which allows using custom system as a video source. This means that the systems, installed on other computers can connect to any channel custom system and receive data from it as from the IP-camera. The setting of remote access also is necessary for the work of video archive on the net.
Group. The name of group, which includes the system.
Port. This field specifies the port on the local machine to access the custom system as to the IP-camera.
Turn on authentification - if this option is activated, when you try to remotely connect to a custom system, login and password will be required.
Login and password. This fields are filled by the login and password for access to custom system. This means that in the settings of all systems, which are connected to the custom system, it will be necessary to enter the same login and username as entered in these fields.
Gateway. This setting is set if the system, which needs to receive video and the custom system, are located in different subnets. It is written in the form of a pair «IP-address: port».
In order to define access setting, one must consistently perform the following steps (see fig. Access settings. Saving access settings):
Users. Access settings Пользователи и настройки доступа Administración de los usuarios y configuraciónes de acceso
- Documentation for Administrator of Overseer Parking
- Documentation for Administrator of AutoCode for VMS Parking
- Documentation for Administrator of AutoCode XProtect 1.0 Parking
- Documentation for Administrator of Overseer Traffic
- Documentation for Administrator of AutoCode for VMS Traffic
- Documentation for Administrator of AutoCode XProtect 1.0 Traffic
