Recognition Servers, Enterprise version
Recognition Servers Management
After the installation, VIT Recognition Server is available for future configuration in Milestone Management Application, Surveillance Server – Advanced Configuration - MIP Plug-ins – VIT Analytic Service section. No additional software is required for VIT Recognition Server management.
List of Recognition Serves is available in Recognition Servers section of Milestone Management Application property tree.
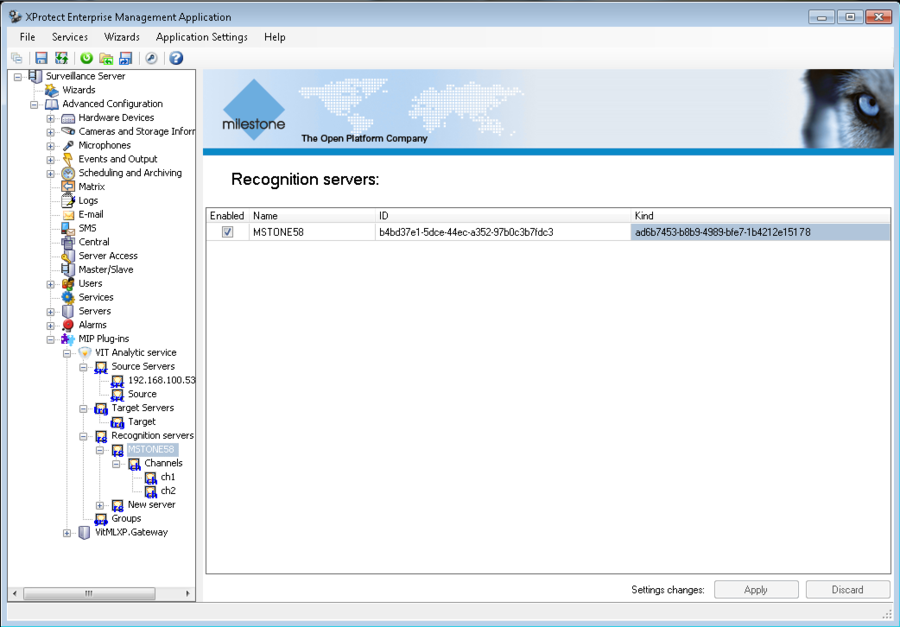
To see all Recognition servers, available in the system, it is necessary to select Recognition Servers section. After that table with list of all Recognition servers will be shown at the right part of the application (see fig. Recognition Servers. List of all available servers).
Table columns properties:
- Enabled – mark in this field shows, if the server can be used;
- Name – Recognition server’s name;
- ID – server’s ID that generated automatically when server created; can’t be edited;
- Kind – ID’s type; can’t be edited.
To get information about some specific server it is necessary to select its name in the servers list. After that table with information about selected server will be shown at the right part of the application (see fig. Recognition Servers. Information about selected server). In addition in properties tree will be shown section with recognition channels, connected to specified Recognition server.
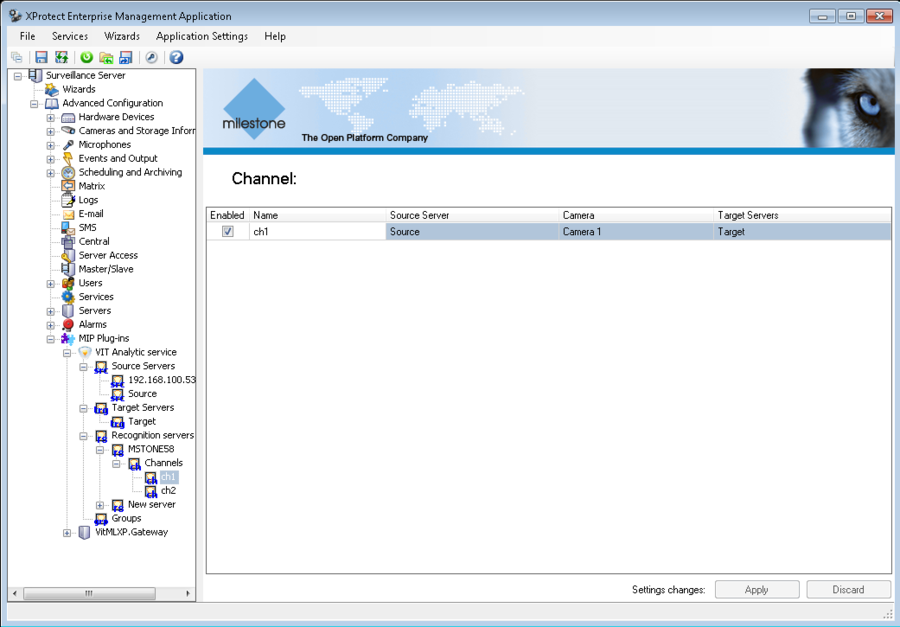
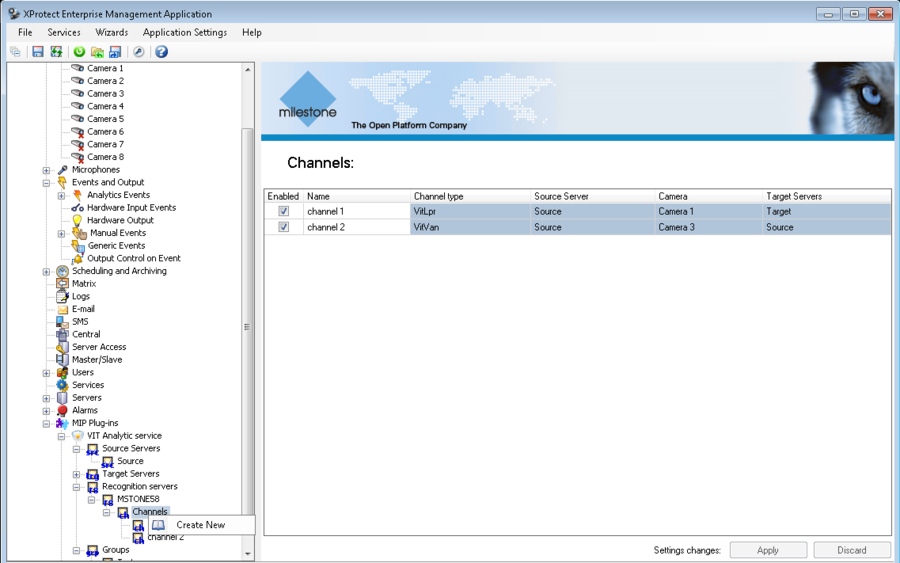
To get information about all recognition channels, connected to specified Recognition server it is necessary to select Channels section, associated with specified Recognition server. After that table with information about channels will be shown at the right part of the application (see fig. Recognition Servers. Information about server’s channels).
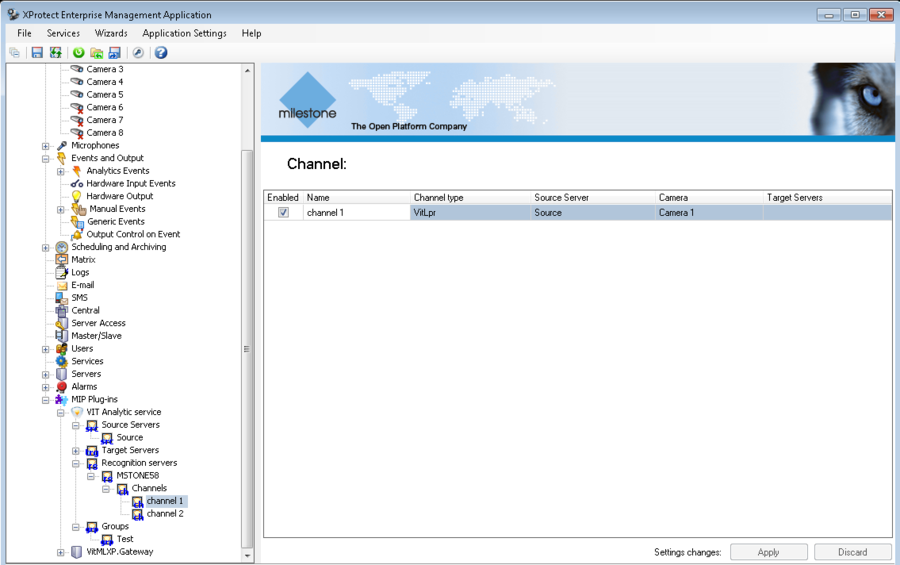
To get information about specified channel it is necessary to select its name in the channels list. After that table with information about channel will be shown at the right part of the application (see fig. Recognition Servers. Information about channel).
New Recognition Server Creation
To create a new Recognition server it is necessary to perform the following steps:
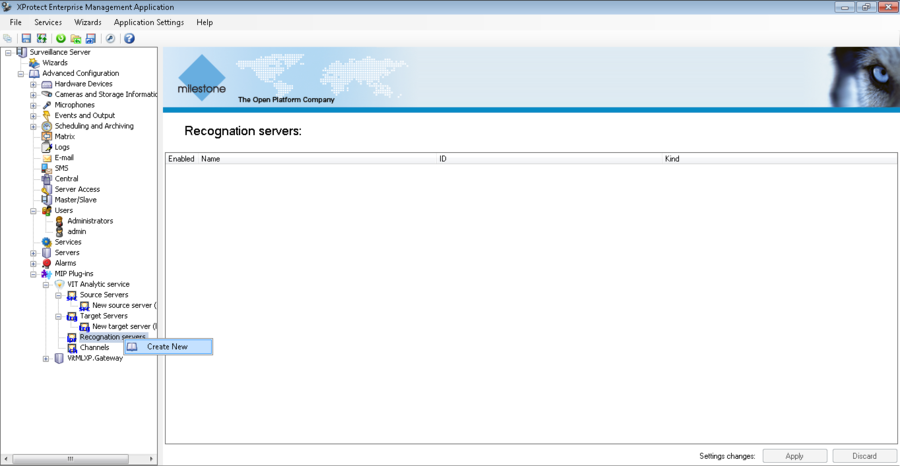
- click with right mouse button on the Recognition Servers section and select Create New in the context menu (see fig. Recognition Servers. New Source Server Creation);
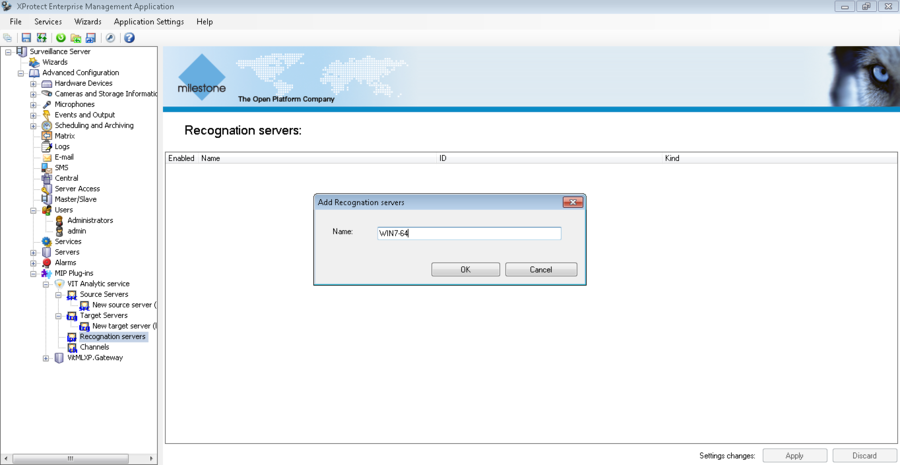
- paste the server’s name in the pop-up window and press the OK button (see fig. Recognition Servers. Server naming).
At this point new Recognition server is created. It is available for future management in the servers list. Server’s settings such as logging path can be set at the server’s side with the help of LPR Server Manager. To connect and tune recognition cannels Milestone Management Application is used.
Recognition Server Configuration
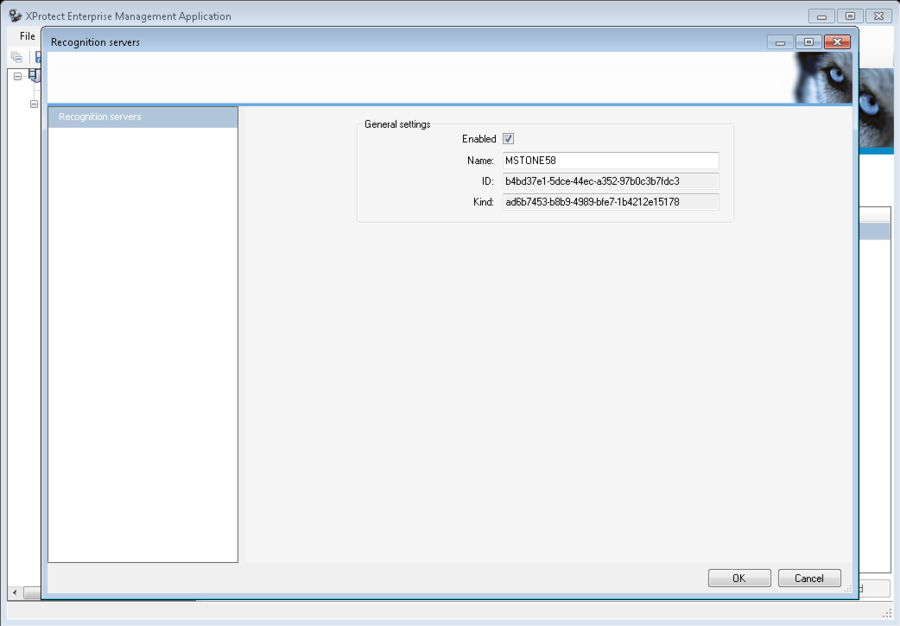
To configure Recognition server’s parameters it is necessary to double click on the specific row at the servers table. After that pop-up window with server’s parameters that are available for editing, will be shown (see fig. Recognition Servers. Recognition Server’s parameters window).
Table columns properties:
- Enabled – flag in this field defines if the server available for usage;
- Name – name of the Recognition server;
- ID – server’s ID that generated automatically when server created; can’t be edited;
- Kind – ID’s type; can’t be edited.
Recognition Server Deletion
To delete existing Recognition server it is necessary to perform the following steps:
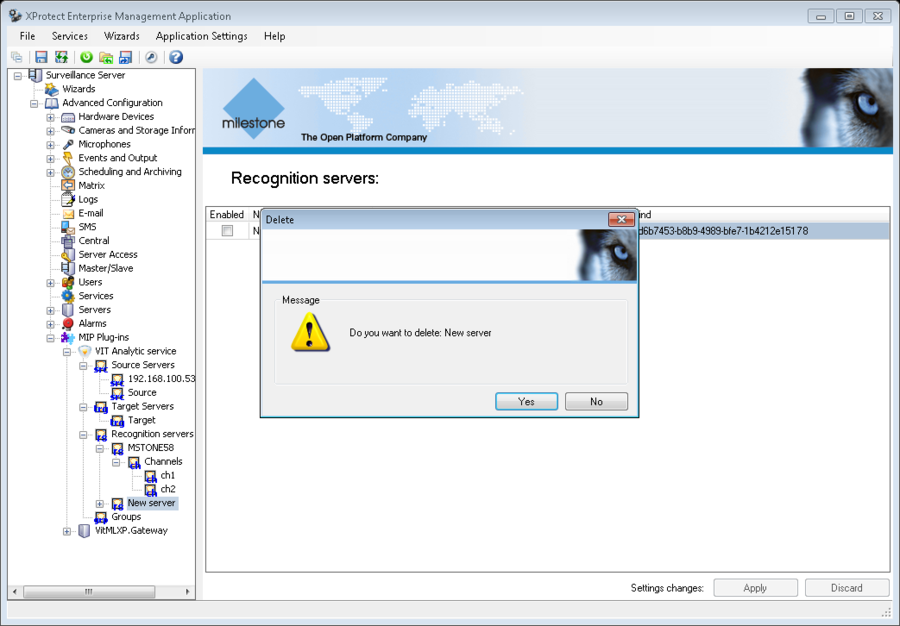
- click with right mouse button on the name of the specified Recognition server and select Delete in the context menu (see fig. Recognition Servers. Recognition server deletion);
- confirm deletion in the pop-up window (see fig. Recognition Servers. Confirmation of deletion).
Recognition Channels Management
Each Recognition channel is connected with one of Recognition servers. To get information about some specific channel it is necessary to select its name in the channels list (see fig. Recognition Servers. Information about selected channel):
- in Channels section that is associated with specified server – if it is known to which server channel connected;
- in general Channels section – if there is no information to which server channel connected.
Table columns properties:
- Enabled – checked field shows, if the channel can be used;
- Name – channel’s name;
- Channel type – channel’s type;
- Source server – Source server that is used by channel;
- Camera – camera that is connected to specified Source server. Video from this camera is used for recognition;
- Target Servers – Target server where recognition results are sent.
New Channel Creation
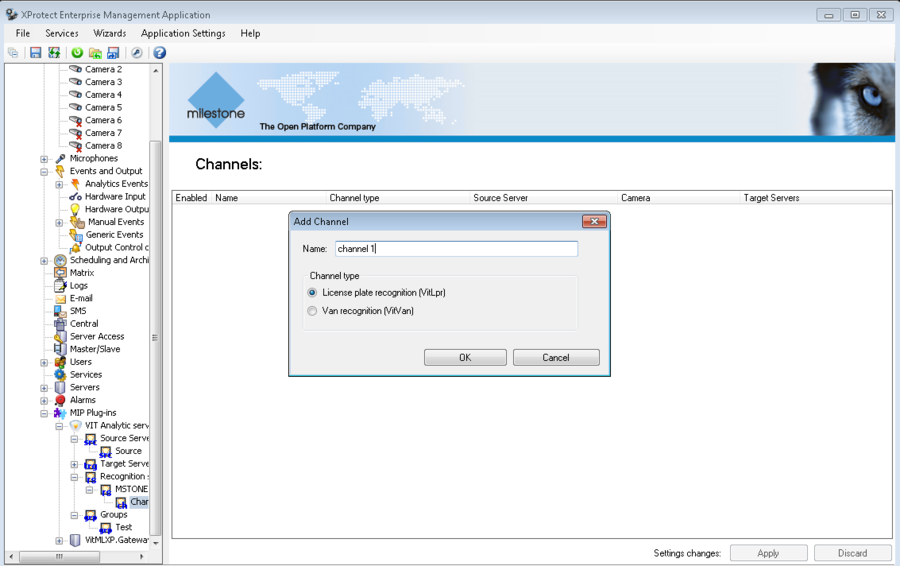
To create a new channel it is necessary to perform the following steps:
- click with right mouse button on the Channels section that is associated with server where channel must be created and select Create New in the context menu (see fig. Recognition Servers. New Channels Creation)
- paste the channel’s name and type in the pop-up window and press the OK button (see fig. Recognition Servers. Channel naming). Possible channels’ types:
- License plate recognition (VitLpr) – channel for car license plate recognition;
- Van recognition (VitVan) – channel for wagon license plate recognition.
At this point new channel is created. It is available for future management in the channels list.
Channel Configuration
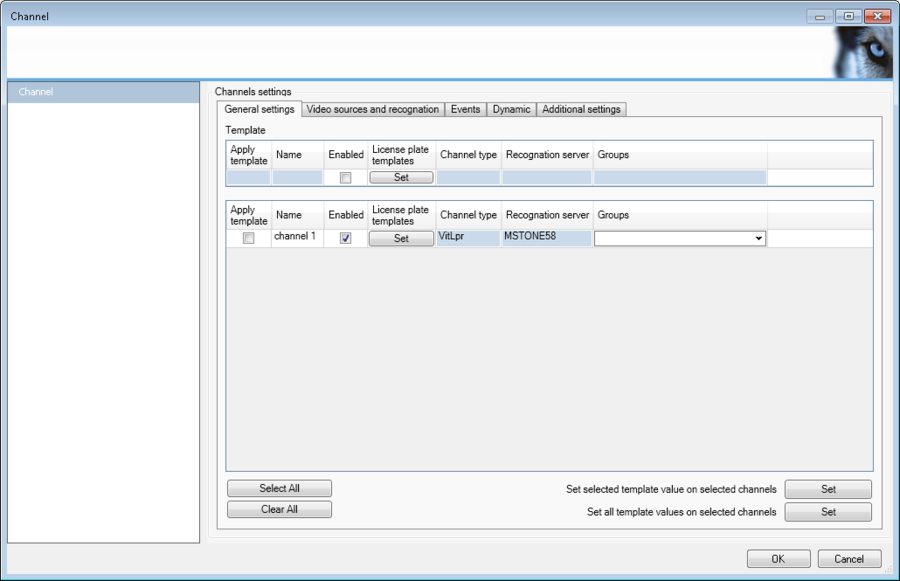
To configure channel’s parameters it is necessary to double click on the specific row at the channels table. After that pop-up window with channel’s parameters that are available for editing, will be shown(see fig. Recognition Servers. Channel’s parameters window).
Table General settings columns properties:
- Name – channel’s name;
- Enabled – flag in this field defines if the channel available for usage;
- License plate templates – license number plates’ templates (types of license number plates’ that will be recognized at the specified channel, ordered by country);
- Channel type – channel’s type that is defined at the channels creation;
- Recognition server – Recognition server where recognition runs;
- Groups – group or groups of devices that channel belongs.
License Number Plate’s Templates
To define license number plate’s templates it is necessary to perform the following steps:
- open tab General settings at Channel settings window;
- press the Set button in column License plate templates for specified channel or in the table Template, if several channels must recognize license number plates of the same counties;
- select countries and templates in the pop-up window and press the OK button (see fig. Recognition Servers. Recognition templates management).
Attention!
Each channel can be managed independently of other channels. For one channel can be selected any number of templates and counties. However, it’s not recommended to select templates that won’t be used – this can reduce the recognition quality. Select only templates that correspond to license plates on the recognizable video. For example, if you use video file with Ukraine cars only, don’t select Russian or USSR or any other template, except Ukraine.
Connection of Video Source
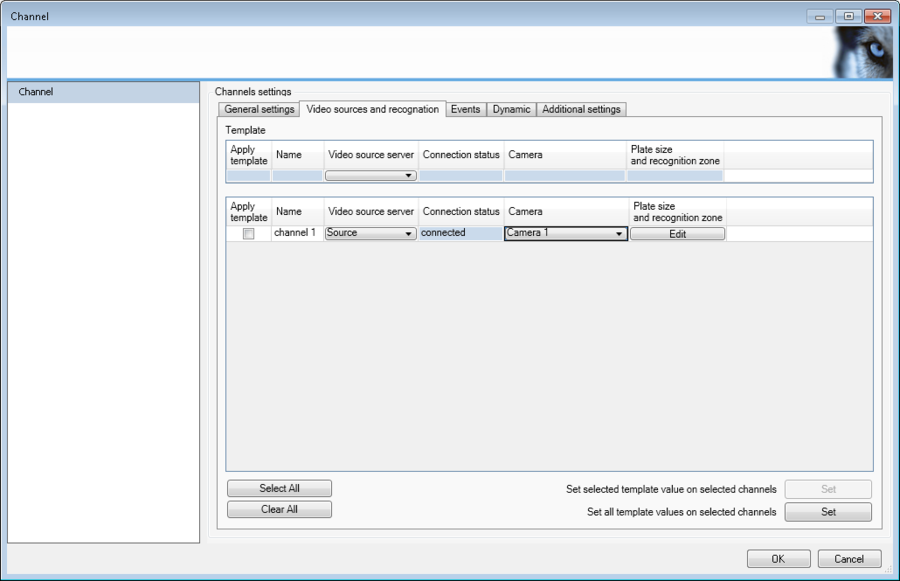
To connect video source it is necessary to perform the following:
- open tab Video source and recognition at Channel settings window;
- select Source server from servers list in column Video source server for specified channel. If connection established in column Connection status word connected appears (see fig. Recognition Servers. Connection of video source). If that didn’t happened check connection settings for Source;
- select camera from cameras list in column Camera – video from this camera will be used for recognition.
Plate Number Size
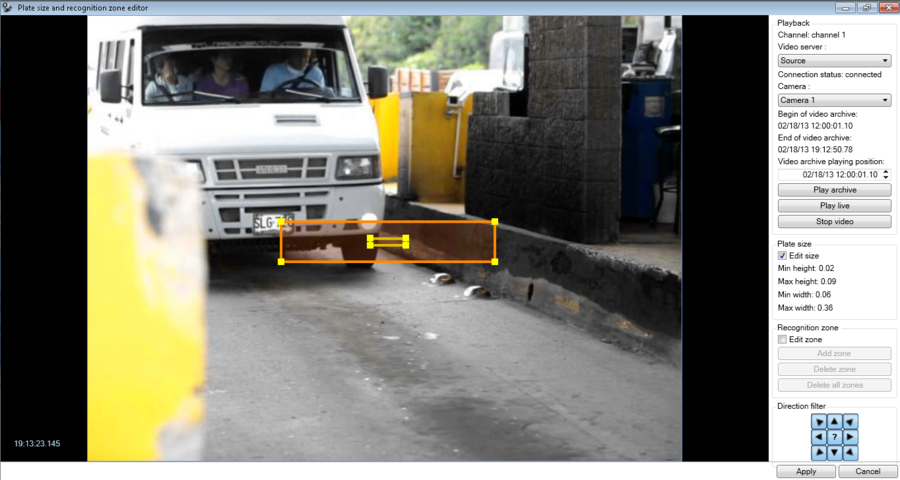
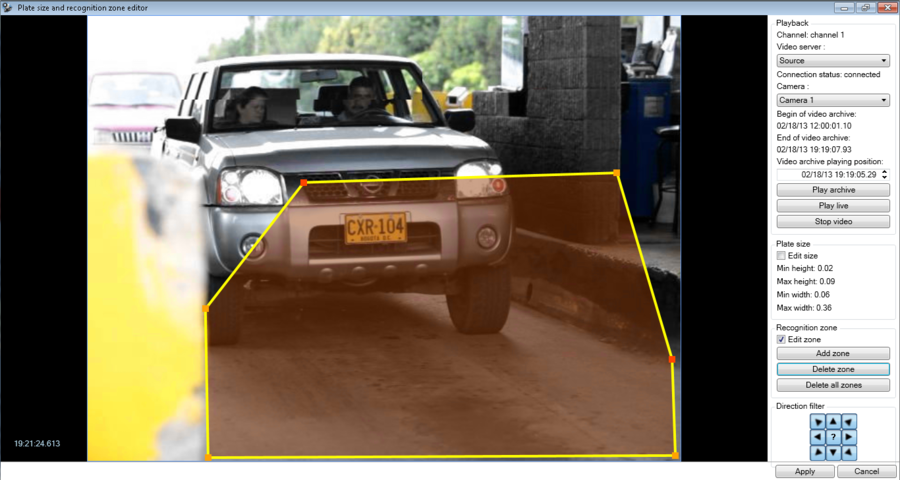
This setting specifies the estimated size of a number plate on the frame; is used to improve system performance by cutting off areas that clearly cannot be license plates.
In order to set the plate number size it is necessary to perform the following steps:
- open tab Video source and recognition at Channel settings window;
- press the Edit button in column Plate size and recognition zone for specified channel;
- enable Edit size option in the pop-up window;
- change rectangles’ sizes on the screen scaling then to the appropriate dimensions (see fig. Recognition Servers. Plate number size);
- press the Apply button.
Default values: min = 3%, max = 40%.
It is especially important to specify the upper bound correctly. If the setting is incorrect, the recognition can performed badly or not performed at all. It is recommended to set the maximum size greater than the actual size on 10-15%. Difference between the minimum and maximum sizes must be around 30%.
Recognition Zone
This setting allows selection of the zone in which search for numbers will be performed. This improves the system performance by cutting off areas that clearly cannot contain car images. By default, recognition runs on the entire frame.
In order to add the recognition zone it is necessary to perform the following steps:
- open tab Video source and recognition at Channel settings window;
- press the Edit button in column Plate size and recognition zone for specified channel;
- enable Edit zone option in the pop-up window;
- press the New button;
- drag the yellow squares located at the edges of the zone on necessary parts. In order to form a polygon, click on viewport by left mouse button - this will add one more vertex (see fig. Recognition Servers. Recognition zone);
- press the Apply button.
To change the recognition zone, click on the zone by right mouse button. Recognition zone will be “active”, yellow squares will appear on its tops, available for transfer. By default “active” – is zone that was created last.
One can delete a single zone of recognition as well as all zones at once. In order to remove one recognition zone, select the appropriate zone and click Delete. If you do not select zone, and you just click Delete, then the zone that was added last will be removed.
To delete all the recognition zones one must click the button Delete all.
Target Server Adding
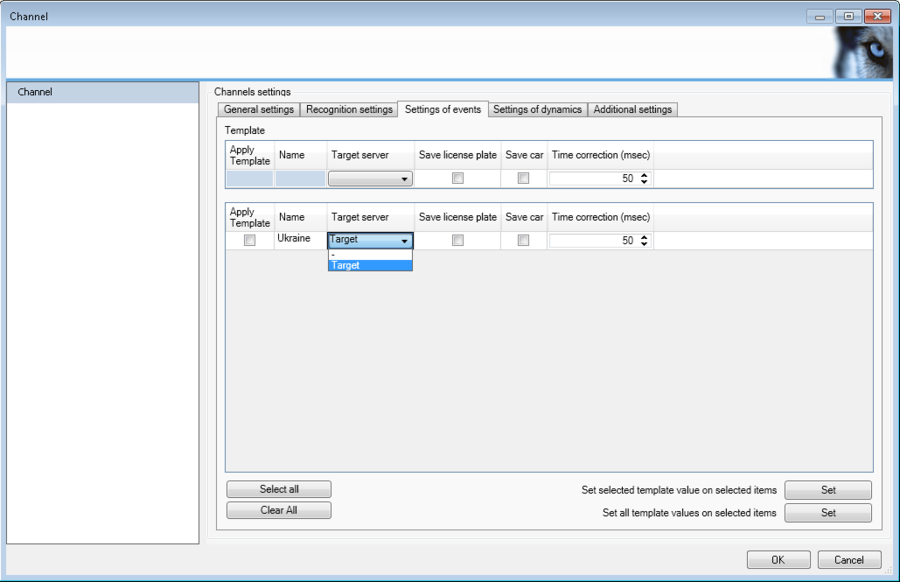
In order to add the Target server it is necessary to perform the following steps (see fig. Recognition Servers. Target server adding):
- open tab Events at Channel Information window;
- select Target server from servers list in column Target server for specified channel;
- enable Save license plate option, if the picture of license plate must be saved in the event;
- enable Save car option, if the picture of vehicle must be saved in the event;
- if it’s necessary change Time correction (msec) – this parameter is used for time correction of license plate highlighting frame in Milestone’s archive.
Attention!
Attention! Usage of Save license plate and Save car options can course a significant increase of the Data Base size. Don’t enable these options if it isn’t really necessary. But if you’ve enabled them than you need to adjust archive cleaning in Milestone Management Application and control DB size and free space on the disk.
Dynamics Settings
Dynamics means queue of frames processing for getting best recognition result in future. It is necessary to enable these options, unless every frame must be processed separately. This group of options available only for channels with type = VitLpr.
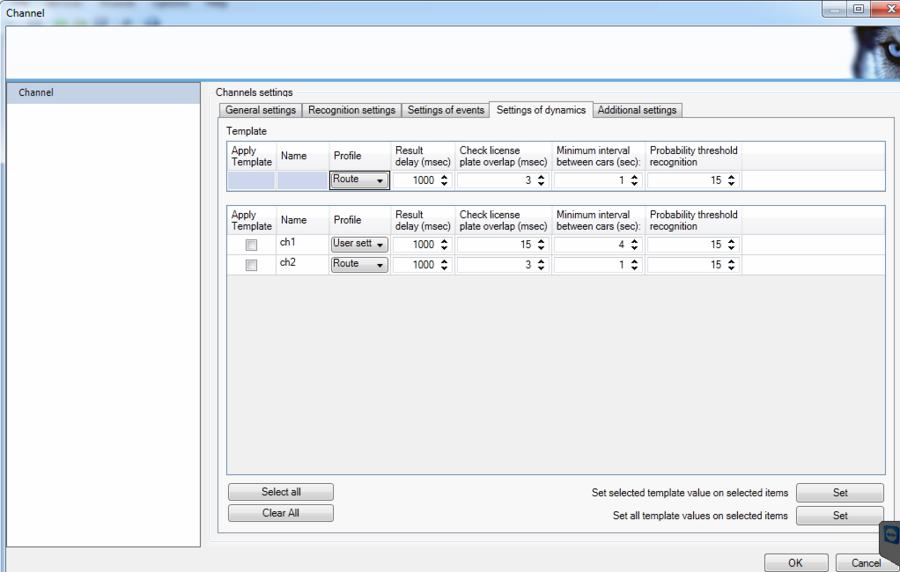
To define dynamics it is necessary to perform the following steps (see fig. Recognition Servers. Dynamics settings):
- open tab Dynamic at Channel settings window;
- click on the channel’s name in channels table to specify channel that will be managed;
- select one of two pre-set profiles or create new one:
- Parking – vehicle speed is lower than 30 km/h; average optimal settings (steps 5-9) are setting automatically;
- Route - vehicle speed is higher than 30 km/h; average optimal settings (steps 5-9) are setting automatically;
- User settings – user must define optimal settings (steps 5-9) by himself;
- define Result delay(sec) – time after which first recognition result will be shown;
- define Check license plate overlap (msec) – period in time (in milliseconds) which results can be “glued” to one result in case when license plate will be lost from frame (for example, in case if somebody passed in front of the car);
- define Minimum interval between cars (sec) – period in time (in milliseconds) which results will be “glued” to one result;
- define Probability threshold recognition – percentage of matching of recognition result with standard license plate (corresponding to template: without geometric distortion, using correct font, ect.). Increasing this parameter increases recognition quality, but reduces the number of recognition results. This option available only for channels with type = VitLpr.
Additional Settings
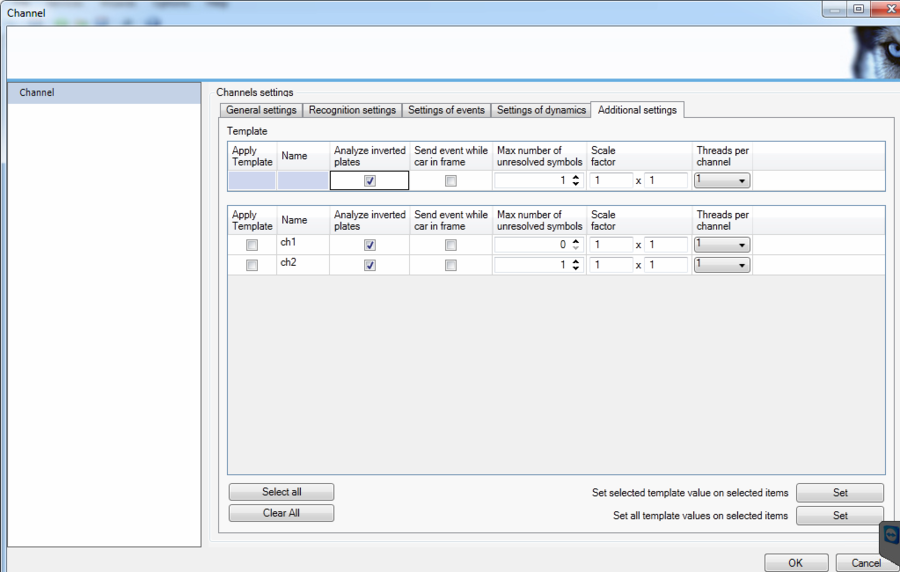
To define additional settings it is necessary to perform the following steps (see fig. Recognition Servers. Additional settings):
- open tab Additional settings at Channel settings window;
- click on the channel’s name in channels table to specify channel that will be managed;
- enable Analyze inverted plates option, if plates with white letters on a black background must be recognized;
- enable Send event while car in frame option, to send recognition event to Target server while vehicle still on frame. By default event is sent after vehicle leaves the frame. This option available only for channels with type = VitLpr;
- define Max number of unresolved symbols - maximum number of characters, which allow us to consider the number plate as recognized and record it in the event. This option available only for channels with type = VitLpr;
- define Scale factor – vertically and horizontally scaling factor that applied to the frame before recognition (for megapixel cameras). Drop-down list of this field makes it possible to set this parameter values from 1 to 4. By manual editing this field scale factor can be set up to 10 points. This option available only for channels with type = VitLpr;
- select from Threads per channel drop list number of recognition streams recognition (for megapixel cameras). This option available only for channels with type = VitLpr.
Channel Deletion
To delete existing channel it is necessary to perform the following steps:
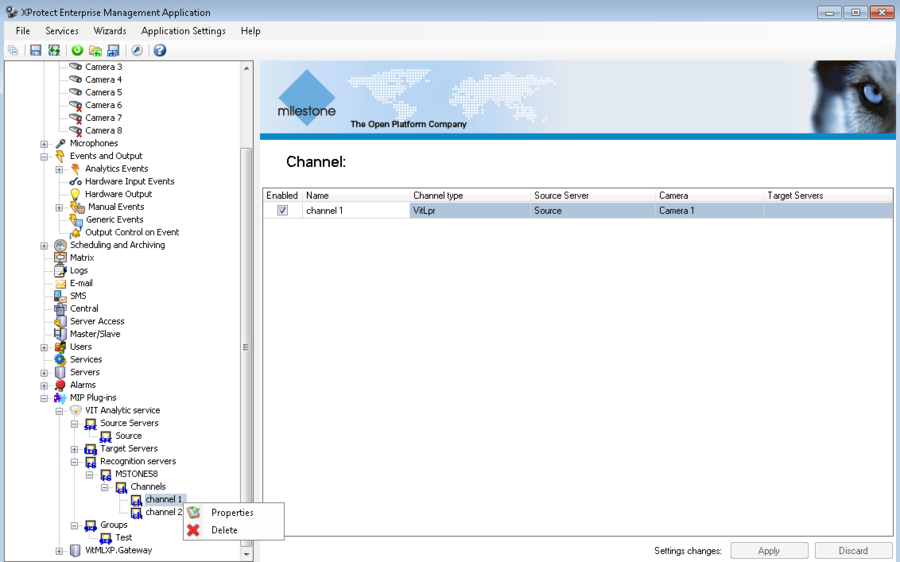
- click with right mouse button on the name of the specified channel and select Delete in the context menu (see fig. Recognition Servers. Channel deletion);
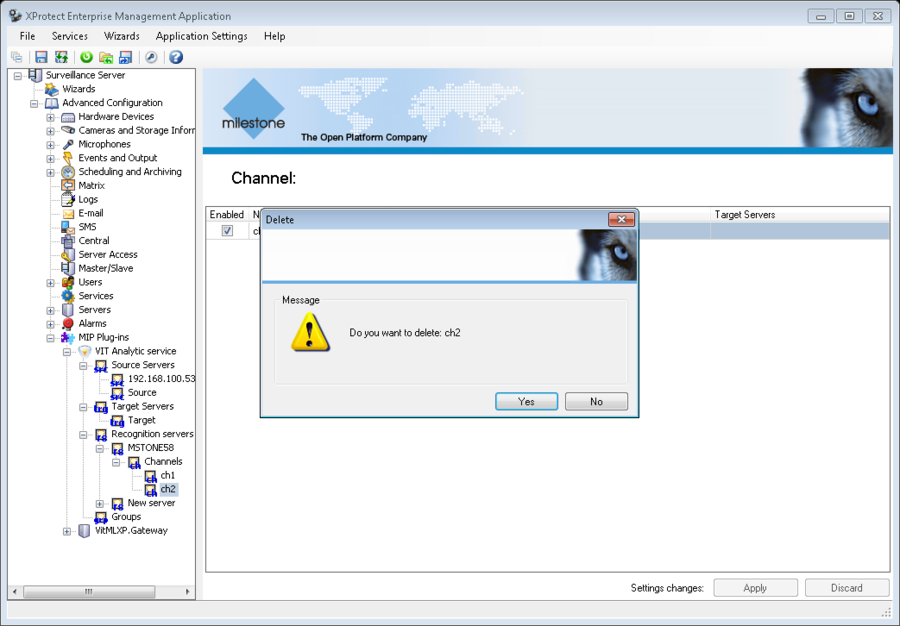
- confirm deletion in the pop-up window (see fig. Recognition Servers. Confirmation of deletion).
Operations with Templates
Templates are provided to simplify the channels management.
Template – it's a value of a specified parameter or values of a set of parameters which will be applied to all selected servers. Template usage is recommended in a situation when the number of servers with the same parameter or parameters must be configured.
To use a template, it is necessary to perform the following steps:
- double click on the channel’s name or its settings to activate Channel Information window;
- open tab with parameters that must be managed;
- paste channel(s) parameters to the Template table;
- enable Apply template option for that channels, which it is necessary to apply the parameters, specified at step 3;
- press the Set button:
- Set selected template value on selected channels – only active value from the Template table (cell is framed or highlighted) will be applied to the servers specified at the step 4;
- Set all template values on selected channels - all values from the Template table will be applied to servers specified at step 4.
Example
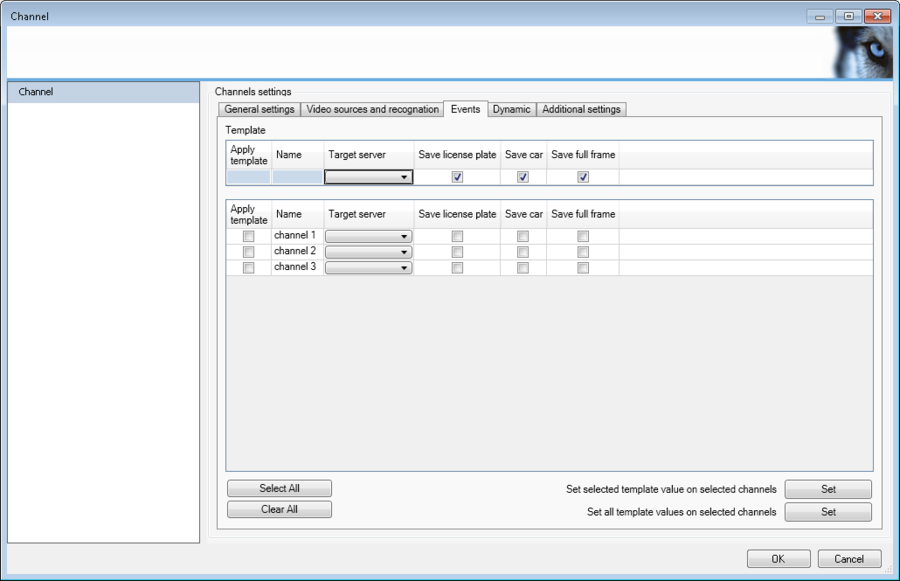
There are three channels in a system. Target server and recognition parameters must be defined for them. Default parameters are (see fig. Recognition Servers. Default parameters):
- parameters Save license plate, Save car, Save full frame – «no» (flag disabled);
- Target server undefined.
Next, parameters must be set:
- same Target server for all channels;
- Save license plate – «yes», for all channels;
- Save car – «yes», for the first and the second channels;
- Save full frame – «yes» only for the first channel.
Possible configuration with use of templates is described below.
Step 1
- enter Target server’s name in the Template table;
- enable Save license plate and Save car options in the Template table;
- disable Save full frame option in the Template table;
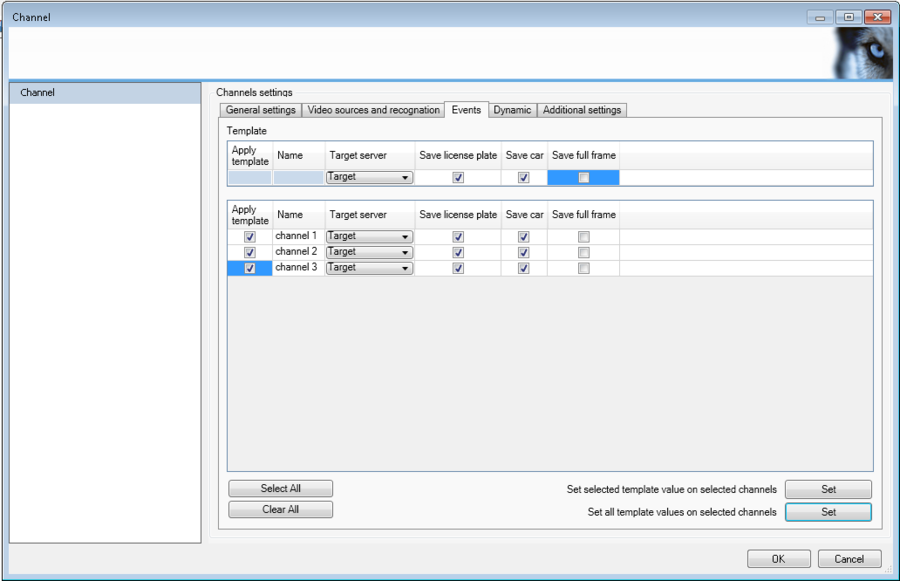
- in channels table enable Apply template option for all channels;
- press the Set button for Set all template values on selected channels option.
The result of the step 1 is shown in the figure Recognition Servers. Step 1 of configuration, using template.
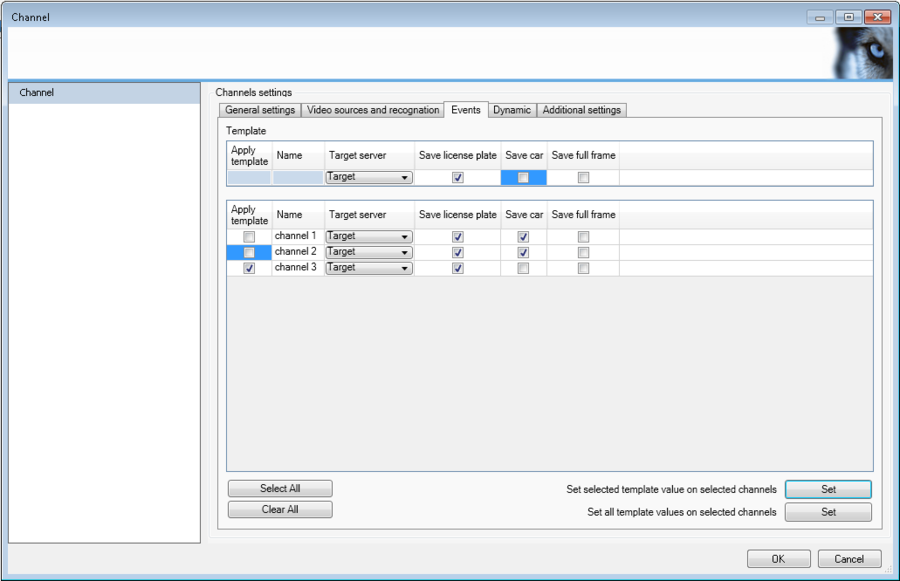
Step 2
- disable Save car option in the Template table;
- in channels table enable Apply template option for the third channel;
- press the Set button for Set selected template value on selected channels option.
The result of the step 2 is shown in the figure Recognition Servers. Step 2 of configuration, using template.
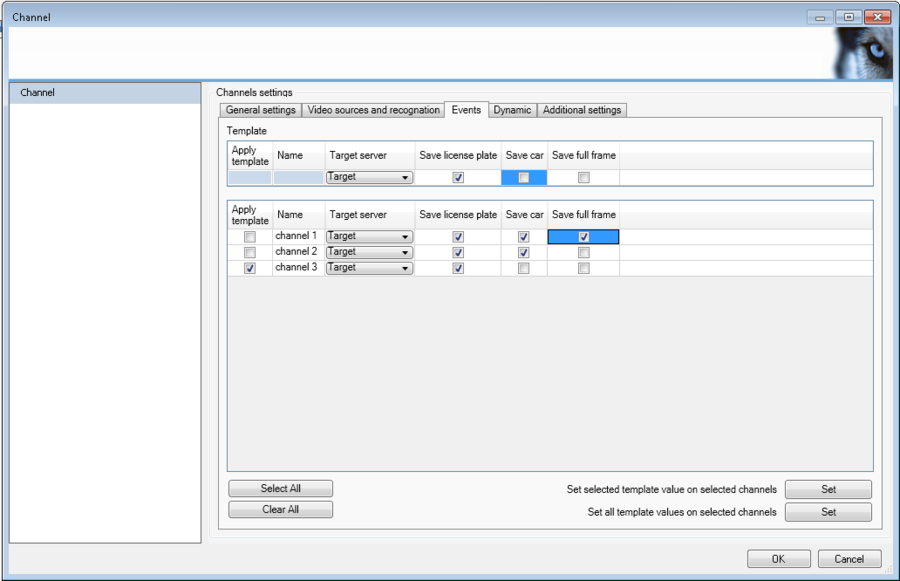
Step 3
- enable Save full frame option for the first channel in channels table.
The result of the step 3 is shown in the figure Recognition Servers. Step 3 of configuration, using template.
Channel(s) configuration is finished.
Recognition Servers, Enterprise version Сервера Аналитики, версия Enterprise
