Access Control Solution, Corporate version
VIT Recognition Server and Access Control
VIT Recognition Server – is a platform that designed to solve Customer’s business challenges connected to vehicles’ number plates recognition and recognition results processing. In this document step-by-step instruction how to create and configure access control system on VIT Recognition Server is provided:
- VIT Configurator – recognition channels configuration and local number plate lists management for access control;
- VitMLXP Gateway – events processing and connection of the external databases (PostgreSQL и MSSQL) as remote data sources for access control lists;
- VIT Analytic server и VIT LPR – number plate recognition for future processing.
Construction of access control system based on VIT Recognition Server can be divided into two phases:
- recognition adjustment;
- access parameters adjustment.
Full description of VIT Recognition Server modules and their settings is available in the documentation provided by VIT. Recognition adjustment is described in “Recognition adjustment. Quick guide” manual, so this document is devoted exclusively to the second part of the access control system construction - access parameters adjustment: access lists creation, external databases as remote data sources for access control lists connection, etc.
After the installation, VIT Recognition Server is available for future configuration in Milestone Management Application, Surveillance Server – Advanced Configuration - MIP Plug-ins – VIT Analytic Service section. The package of scripts for access control system creation is provided by VIT, no additional software is required.
Local Number Plate List as a Source of Access Control
To configure access control system based on local number plate lists the following steps must be performed:
- create a new access list;
- add to the access list manually or export from .csv file plate numbers;
- associate the list that was created with the cameras.
All scripts and libraries for local number plate lists exploitation are provided by VIT.
Local access list management
New access list creation
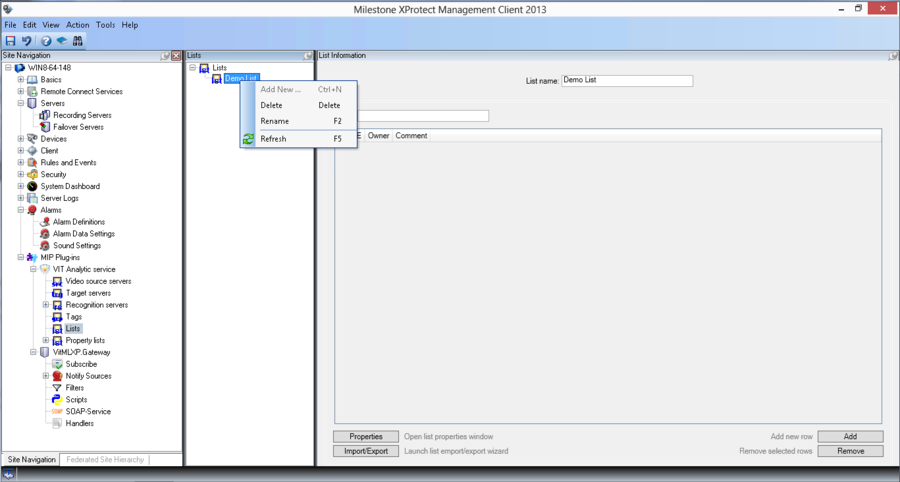
To create a new local access list it is necessary to perform the following steps (see fig. System of access control. New access list creation):
- click with right mouse button on the Lists section and select Add New in the context menu;
- paste the list’s name in the pop-up window and press OK button.
At this point new access list is created. It is available for future management in the access lists list.
Manual adding of the number plate to the access list
To configure access list’s parameters it is necessary to click on the specific list’s name in the Lists window. After that edit list’s parameters or related license plate numbers in List Information window (see. fig. System of access control. List’s parameters window).
The following information is displayed in the window:
- List name – name of the current access list;
- Filter – field for parameters of license plates related to the current access list filtration. Filter is key-sensitive and works for substring: start entering license plate number and in Plate table will be displayed all license plate numbers that contain the entered data;
- Plate table – table with license plate numbers related to the current access list;
- Properties – button that opens window Properties, where number and names of list’s columns can be changed;
- Import/Export – button that opens window Import/Export, where parameters of access list import/export can be defined;
- Add – button that adds a new row to Plate Table, where new license plate number can be pasted manually;
- Remove – button that removes selected license plate number from the access list.
To add a license plate number to an access list, click Add button and paste the number in a new row that appeared in Plate table. Then press OK button to save the changes.
Import and Export of the Access list
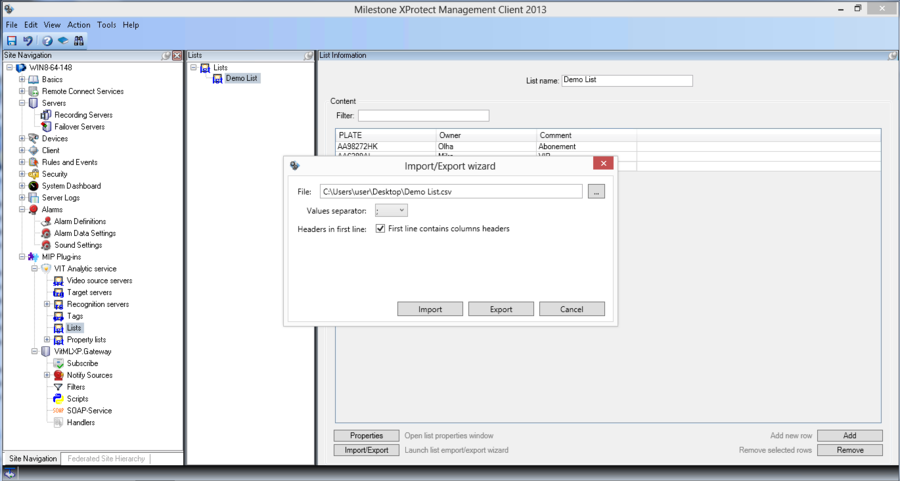
To import or export access list it is necessary to perform the following steps (see fig. System of access control. Import and Export of the Access list):
- click on the name of specified of specific row at the lists table;
- click Import/Export button on a window List Information;
- define in the pop-up window Import/Export:
- path for import and import parameters and click Import button;
- path for export and export parameters and click Export button.
Access List’s Parameters Management
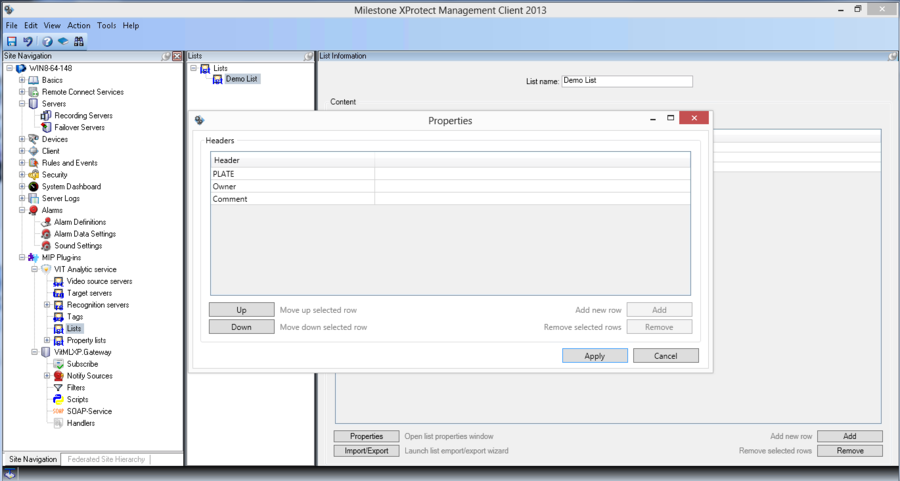
To make changes in the access list’s parameters it is necessary to perform the following steps (see fig. System of access control. Access List’s Parameters Management):
- click on the name of specified of specific row at the lists table;
- click Properties button on a window List Information;
- define list’s parameters in the pop-up Properties:
- to add a new column to the access list click Add button and paste its name in a new row that appeared;
- to delete column from the list select it by click and Remove button;
- to reorder columns displaying select by click the column you want to move and click buttons Up or Down to change its position;
- press Apply button to save the changes.
Attention!
If there are several columns in the list one of them must be names as PLATE. If there is only one column in the list no matter how it will be named. Also, please, note that change number of access list columns is possible if no license plate numbers were added to the list.
Connection Access List and the Camera into One Group
Search is performed in the lists that are associated with the camera where license plate number was recognized. If the camera is associated with several lists, search will be performed consistently in all that lists. Search is performed until the first match.
To associate the access list with the camera they must be connected into one group by Tag.
New Tag Creation
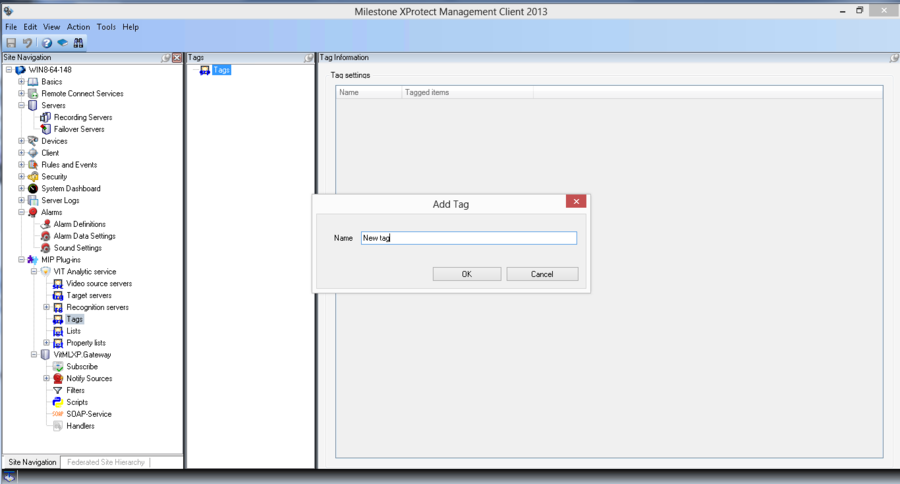
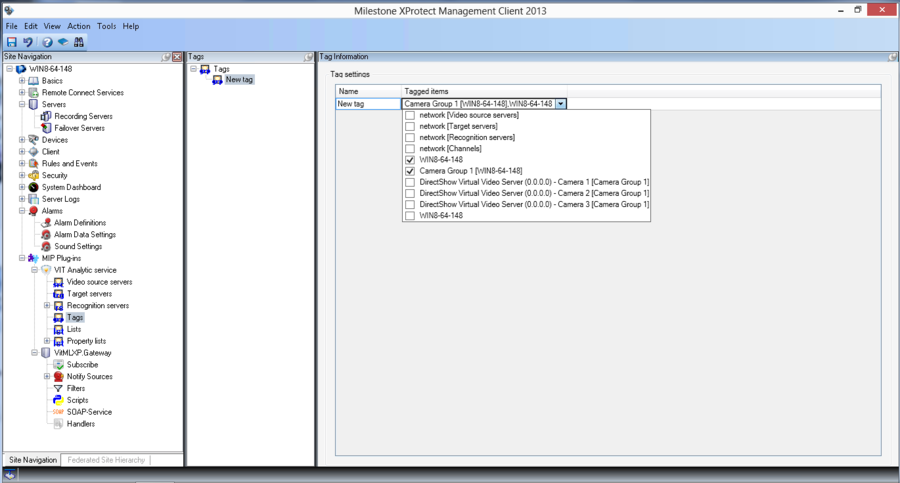
To create a new Tag the following steps must be performed (see fig. System of access control. New Tag Creation):
- click with right mouse button on Tags section in Tags window and select Add New in the context menu;
- paste the tag’s name in the Add Tag pop-up window and press OK button.
At this point new Tag is created. It is available for future management in the Tags list.
Tag’s parameters management
To change Tag’s parameters and associate the access lists and the cameras the following steps must be performed (see fig. System of access control. Tag’s parameters management):
- click on the name of specified tags in Tags window;
- select the access lists and the cameras which must be associated in the drop list of the tag that was created. As it was told before to one group (tag) must be added all access lists and cameras where search must be performed.
- press OK button to save the changes.
For example Camera 1 and access list named “My list” were added to one group. When any license plate number is recognized at Camera 1 it will be searched in “My list”. Other lists and cameras if they are will stay untouched.
In case number plate is not found in any of the linked lists than an Analytic event called "Unlisted license plate" is generated and it contains link to event that caused this Analytic event.
External Access List Management
Usage of the external databases as remote data sources for access lists means that access list where recognized license plate number search must be performed is saved in the external database that has no relation to the XProtect database.
At the current moment the following databases are supported:
- MSSQL;
- PostgreSQL.
To configure access control system based on external access lists the following steps must be performed:
- import the script that will establish connection to the external database and will perform the search there;
- define the parameters of the connection to the external database;
All scripts and libraries for work with external databases and access lists are provided by VIT Company. At the current moment four scripts are provided:
- script for MSSQL where user can create a sql-query for data search by himself;
- script for MSSQL where sql-query for data search is already created;
- script for PostgreSQL where user can create a sql-query for data search by himself;
- script for PostgreSQL where sql-query for data search is already created.
Scripts for External Databases Import
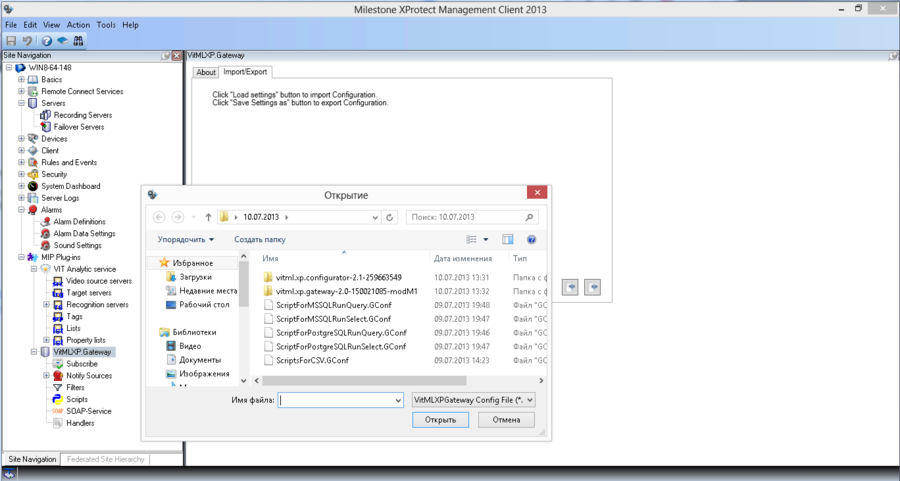
To import a script for external database connection and search the following steps must be performed (see fig. System of access control. Script for External Databases Import):
- click with left mouse button on the VitMLXP.Gateway section and select Import/Export tab;
- press Load settings button and define a path to script that must be imported;
- set import parameters and click OK button;
- click Refresh button to refresh Milestone Management Application property tree.
If import succeed in Scripts section the script with defined name will appear.
External Database Connection Settings Management
Full description of scripts usage is provided in VitMLXP.Gateway Guide. So this document is devoted exclusively to the steps that must be performed to make imported script work.
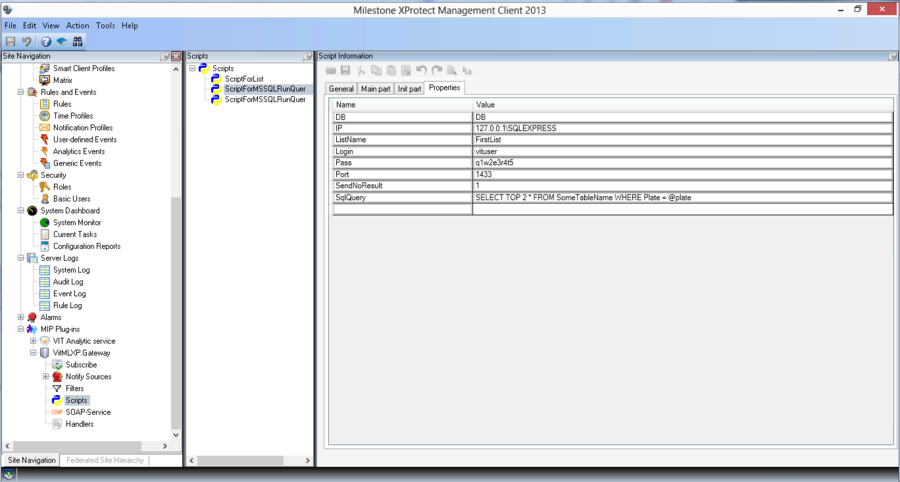
To define connection and search settings of the script the one must perform the following steps (see fig. System of access control. Scripts parameters):
- click on the specified script’s name in Scripts window;
- open tab General at Script Information window;
- select Filter for list filter that was installed with VitMLXP.Gateway in a field Filter and enable Enabled option;
- open tab Properties at Script Information window and define script’s parameters:
- DB – name of the database for connection and search;
- IP – IP-address of the database for connection and search;
- ListName – message that will be displayed with the search results;
- Login – login for connection to the database;
- Pass – password for connection to the database;
- Port – port for connection to the database;
- SendNoResult – option that shows if the message with no search results found will be displayed:
- 0 – message isn’t shown;
- 1 – message is shown.
Attention!
For “Belmont” solution additional script’s parameters were added. So, to make the script work the following data must be pasted:
- FieldFame – the name of the column in the data base with the license plate numbers;
- RecordsToReturn - number of results that will be returned if the records are duplicated in the data base (for example, there are 4 duplicated records in the data base, and the value of this parameter was pasted as “1”. In this case only one message that number is in the list will be returned);
- SendEmptyResult - – this field defines if the “no result” message will be generated for those license plate numbers that aren’t in the list):
- 0 – message won’t be generated;
- 1 – message will be generated.
- GroupName - the name of the column in the data base with the license plate number’s group name.
At this point connection and search settings of the script are defined. After the license plate number is recognized that number will we searched in the external database and search result will be returned.
Work with Search Results
By default, to work with search results no additional settings are demanded. Each script generates event with search result that is displayed in the Alarm list (Events mode) of Milestone Smart Client.
To display search results in the Alarm list (Alarms mode) and Alarms Manager alarm that is connected with search result must be created. Event for Alarm is defined as value of the «ListName» parameter from properties of the script + «no result»/ «result».
For example, there is a script with value of the «ListName» parameter = MSSELECT. If recognized number is in the access list than script will return a message «MSSELECT result». If there is no recognized number in the access list than script will return a message «MSSELECT no result». So, two analytics events can be created for the script: «MSSELECT result» and «MSSELECT no result». These analytics events can be used as Alarm definitions during Alarm creation for future gate integration or sound alerts generation.
Attention!
For “Belmont” solution script returns messages that are different from the default, it’s related to the additional script parameters. For example, list name in the data base is “ExmlList” and group name the vehicle belongs is”ExmlGroup”. In this case the following messages are available:
- ExmlGroup ExmlList - license plate that was recognized is in the list ExmlList and it belongs to the group ExmlGroup ;
- ExmlList no result -license plate that was recognized wasn’t found in the list ExmlList;
- Uknown Group List - there is an error in the name of the column with the groups list.
To receive messages “… no result” analytic event “ ExmlGroup no result” must be created.
Access Control Solution, Corporate version Построение СКУД, версия Corporate
