VitMLXP Gateway Management, Enterprise version
About VitMLXP Gateway
After the installation, VIT Recognition Server is available for future configuration in Milestone Management Application, Surveillance Server – Advanced Configuration - MIP Plug-ins – VIT Analytic Service section. No additional software is required for VIT Recognition Server management.
VitMLXP Gateway module allows to define the processing logic of events that occur during surveillance system operation. So, for example, filtration of events and alarms for future processing, connection to external data sources, license plate numbers lists management and more can be done with VitMLXP Gateway module.
List of VitMLXP Gateway objects is available in VitMLXP Gateway section of Milestone Management Application property tree.
The following objects are available:
- Subscribe;
- Notify Sources;
- Channels;
- Filters;
- Scripts;
- SOAP-Service;
- Handlers.
This document is devoted to description of VitMLXP Gateway objects, their purpose and main operation principles.
Subscribe
Subscribe – is a mechanism that allows to specify events that will enter to VitMLXP Gateway module for future processing.
Subscribe Parameters Definition
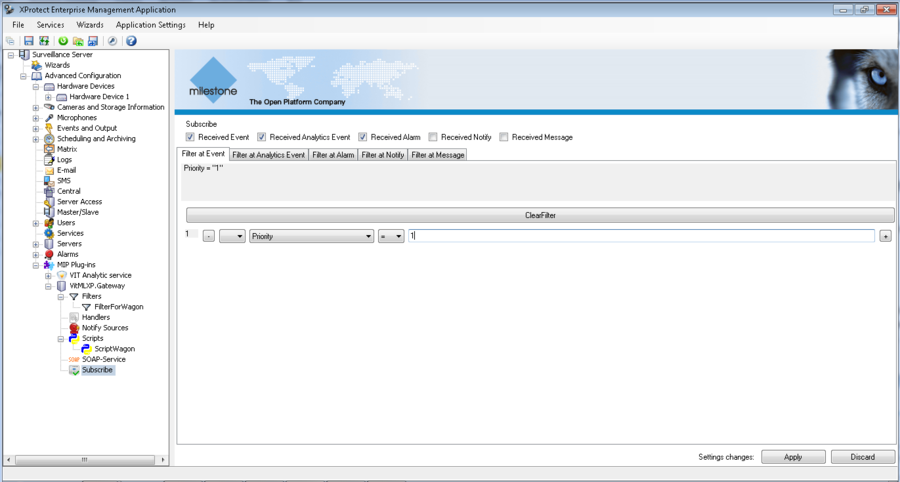
To define subscribe parameters it is necessary to perform the following steps (see fig. VitMLXP Gateway. Subscribe parameters definition):
- click with left mouse button on Subscribe section;
- define subscribe parameters in Configuration window:
- select events which must enter VitMLXP Gateway;
- specify additional subscribe parameters for each type of event;
- press Apply button to save the changes.
Example
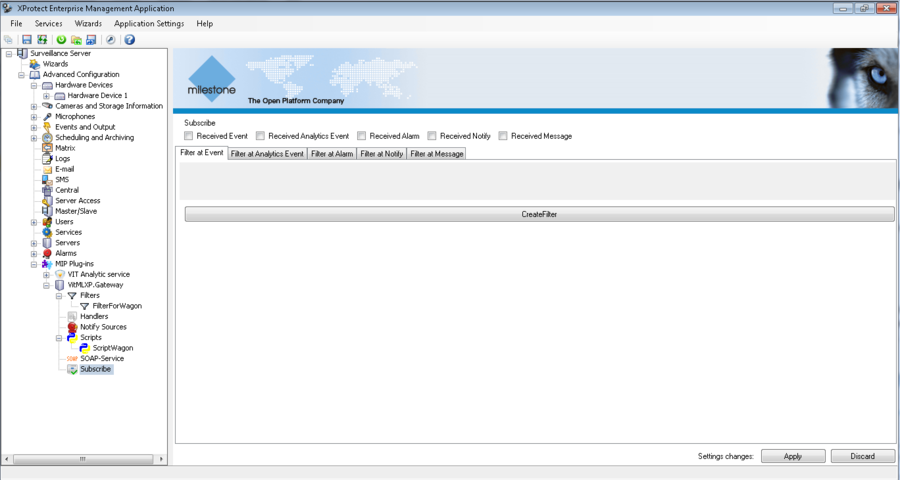
Default subscribe parameters are (see fig. VitMLXP Gateway. Default subscribe parameters):
- Received Event, Received Analytics Event, Received Alarm, Received Notify, Received Message – «no» (flag disabled);
- additional subscribe parameters for each type of event - undefined.
Next, parameters must be set:
- Event type – Received Alarms;
- Additional subscribe parameters – events with priority “High” on cameras 1 and 2.
Possible configuration is described below.
Step1
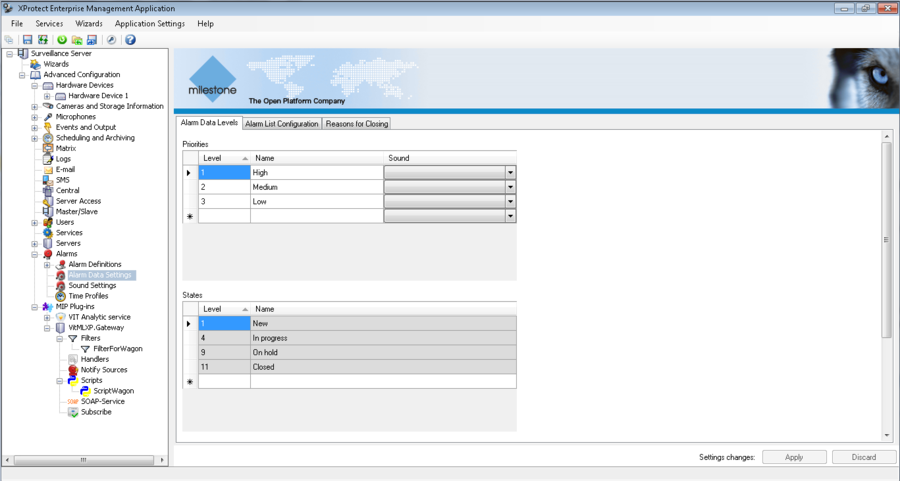
Alarm with priority = “High” definition:
- double click with left mouse button on Alarms section in Site Navigation window;
- click with left mouse button on Alarm Data Settings section in Site Navigation window;
- go to tab Alarm Data Levels on Configuration window;
- find and remember Level of alarm with priority High.
The result of the step 1 is shown in the figure VitMLXP Gateway. Step 1 of subscribe parameters definition.
Step2
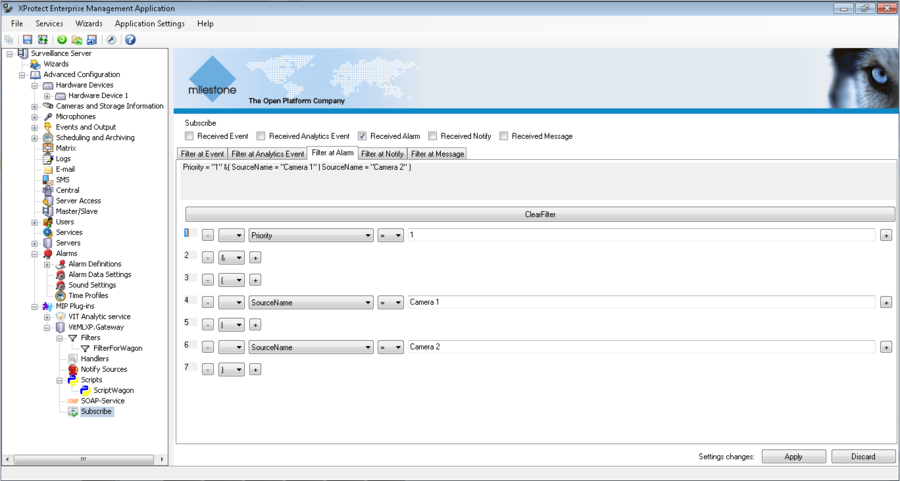
Subscribe parameters definition in VitMLXP Gateway module:
- click with left mouse button on Subscribe section in Site Navigation window;
- enable Received Alarms option;
- go to Filter at Alarm tab;
- press Create Filter button;
- create a logical construction Priority = 1 & (Source Name = Camera 1 | Source Name = Camera 2);
- press Apply button to save the changes.
The result of the step 2 is shown in the figure VitMLXP Gateway. Step 2 of subscribe parameters definition.
Subscribe parameters definition is finished. Now only alarms with priority level High, generated on Camera 1 or 2 will enter VitMLXP Gateway module.
Notify Sources
Notify – is event in external for Milestone system database. Notify sources allow to define parameters of the database where event takes place, and Channels - notification parameters.
Notify Source Creation
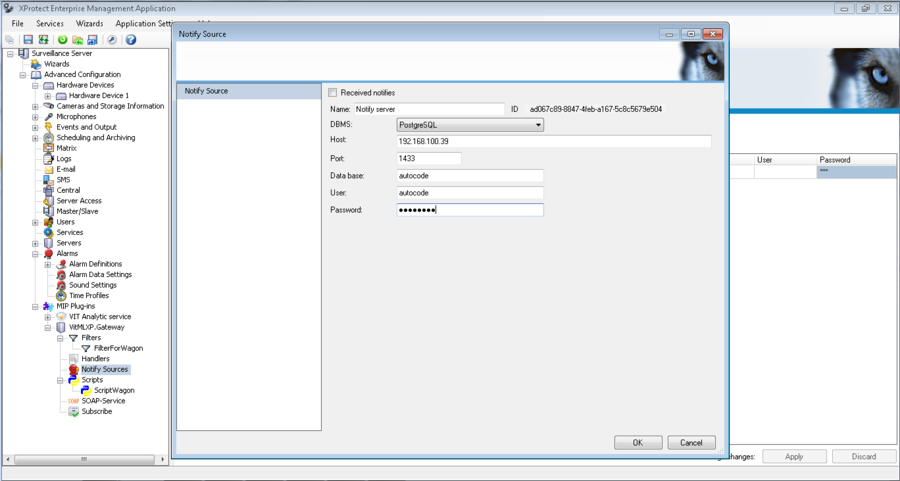
To create a new Notify source it is necessary to perform the following steps (see fig. VitMLXP Gateway. Notify source creation):
- click with right mouse button on Notify sources section in Notify sources window and select Create New in the context menu;
- define Notify source’s parameters in Notify source window:
- Received notifies – flag in this field defines if the Notify source available for usage;
- Name – name of the Notify source;
- ID – source’s ID that generated automatically when source created; can’t be edited;
- DBMS – type of external database. The following databases are supported:
- SQL server;
- PostgreSQL;
- Host - ip-address or a domain name of the computer with external database. If external database is on the same computer with Management Application than ip-address of that computer must be pasted;
- Port - connection port;
- Data base – name of the database that must be used as notify source;
- User - login, that is used for connection to the database;
- Password – password that is used for connection to the database;
- press OK button to save the changes.
Notify Source Configuration
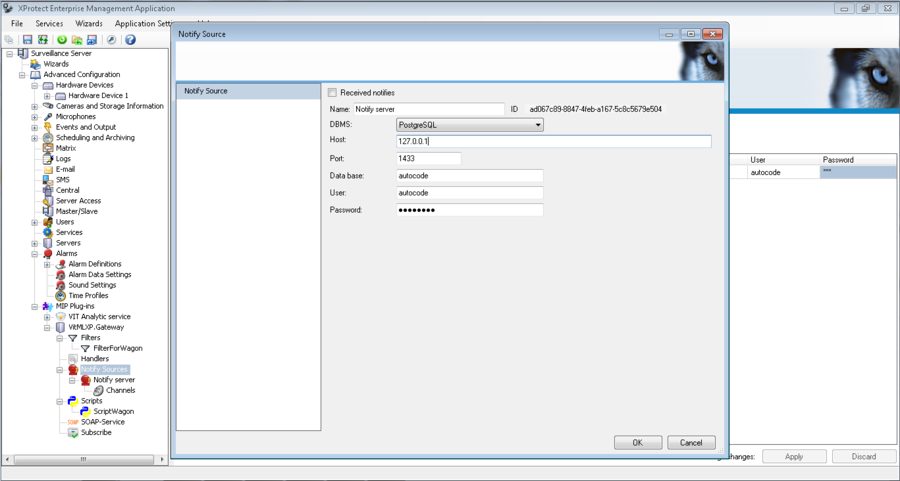
To configure Notify source’s parameters it is necessary to click with left mouse button on the specified source’s name in Notify sources section or in Notify sources table and paste source’s parameters in Notify source window that appears (see fig. VitMLXP Gateway. Notify source configuration).
Notify Source Deletion
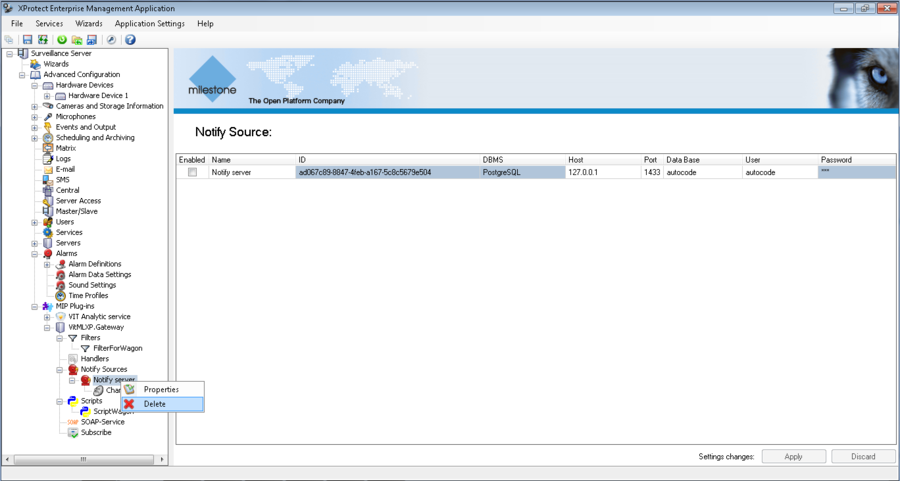
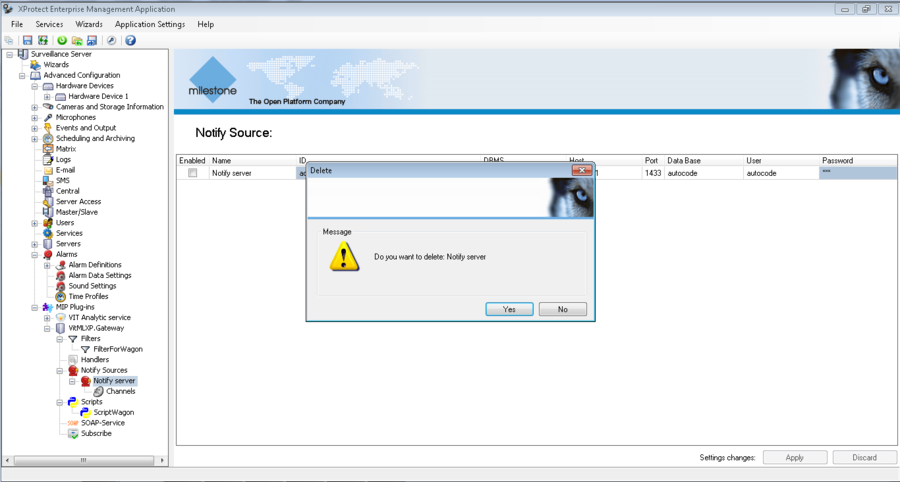
To delete existing Notify source it is necessary to perform the following steps:
- click with right mouse button on the name of the specified Notify source and select Delete in the context menu (see fig. VitMLXP Gateway. Notify source deletion);
- confirm deletion in the pop-up window (see fig. VitMLXP Gateway. Confirmation of Notify source deletion).
Channels
Each channel is connected with one of Notify sources. To get information about some specific channel it is necessary to select its name in the channels list in Channels window.
New Channel Creation
To create a new channel it is necessary to perform the following steps:
- click with left mouse button on Channels section that is associated with Notify source where channel must be created;
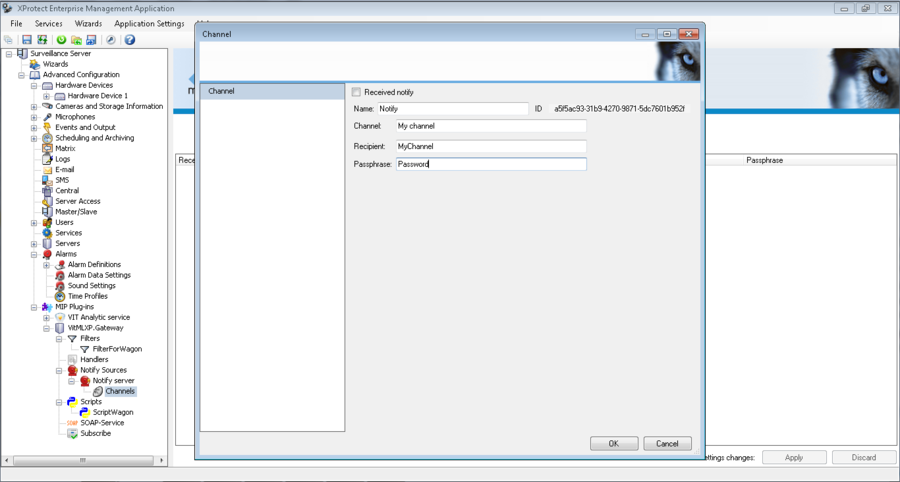
- click with right mouse button on Channels section in Channels window and select Create New in the context menu (see fig. VitMLXP Gateway. New Channel Creation);
- define channels parameters in Channel Information window:
- Received notify – flag in this field defines if the channel available for usage;
- Name – name of the channel in Milestone system;
- Channel – channel in external database to receive the events;
- Recipient – name that is used for channel in external database subscribing. Defined by user;
- Passphrase - password that is used for channel in external database subscribing. Defined by user.
Channel Configuration
To configure channels’ parameters it is necessary to double click with left mouse button on the channel’s name in Channels table and paste channels’ parameters in Channel window.
Channel Deletion
To delete existing channel it is necessary to perform the following steps:
- click with right mouse button on the name of the specified channel and select Delete in the context menu;
- confirm deletion in the pop-up window.
Filters
Filters – is a mechanism that allows to define events for future processing by the scripts.
Attention!
Be careful using Filter and Subscribe options. Subscribe defines events that will enter VitMLXP Gateway module, Filter – filters the events that entered for future processing by the script. If Subscribe defines that only Alarms must enter VitMLXP Gateway, and Filter defines that Events must be filtered, then script connected to that Filter won’t work – Events will be dropped before VitMLXP Gateway.
Filtration Parameters Definition
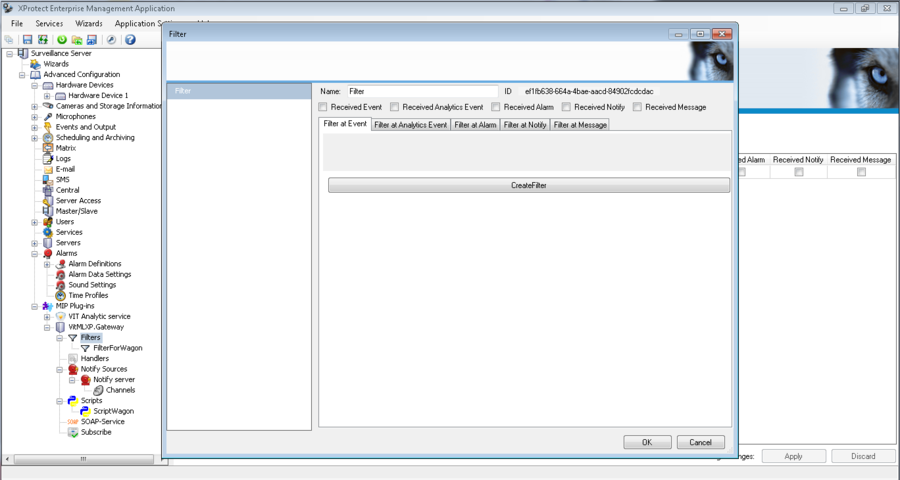
To define filter parameters it is necessary to perform the following steps (see fig. VitMLXP Gateway. Filter parameters definition):
- click with right mouse button on Filters section and select Create New in the context menu;
- define filtration’s parameters in Filter window:
- Name – filter’s name;
- select events which must be filtered;
- specify additional filtration parameters for each type of event;
- press OK button to save the changes.
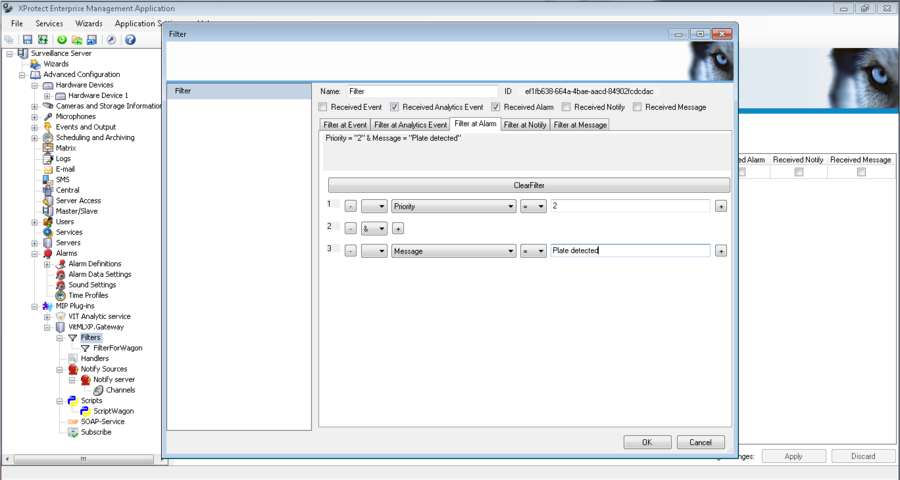
Principles of filter parameters definition creation are similar to principles of subscribe parameters definition, so example of Subscribe parameters definition that is listed above also can be used for Filter parameters definition.
Filtration Parameters Management
To configure filter’s parameters it is necessary to double click with left mouse button on the filter’s name in Filters table and paste filter’s parameters in Filter window that appear (see fig. VitMLXP Gateway. Filtration parameters management).
Filter Deletion
To delete existing Filter it is necessary to perform the following steps:
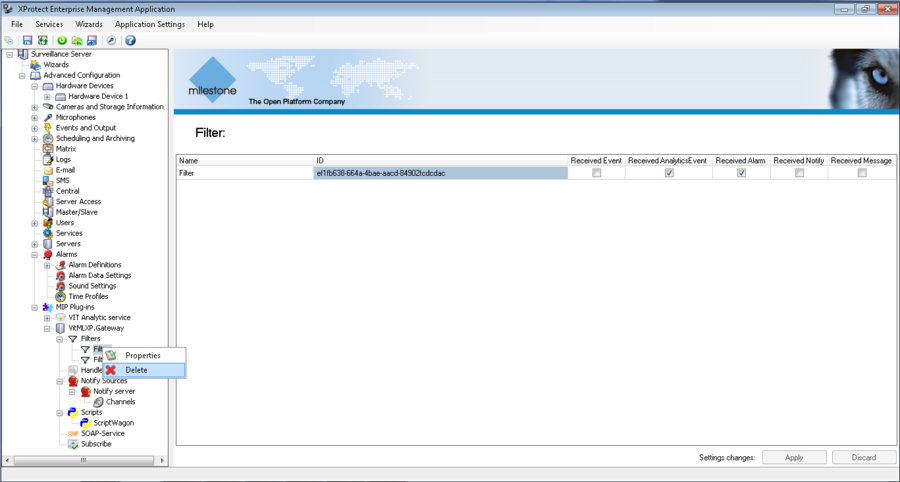
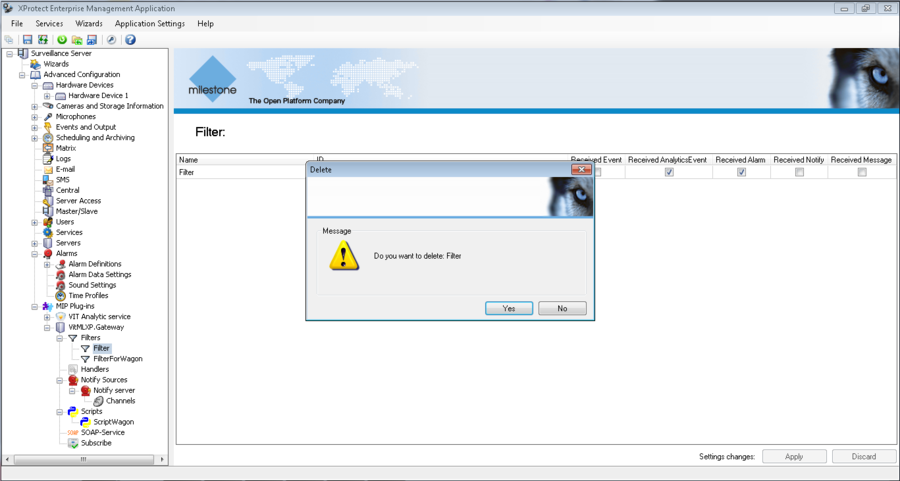
- click with right mouse button on the name of the specified Filter and select Delete in the context menu (see fig. VitMLXP Gateway. Filter deletion);
- confirm deletion in the pop-up window (see fig. VitMLXP Gateway. Confirmation of filter deletion).
Attention!
If any scripts are connected with filter that is deleting, they will stop working after the deletion.
Scripts
Script – is a mechanism that allows to set reaction on the events that enter VitMLXP Gateway. Creation of black and white lists, connection with external databases and any other reactions can be adjusted with it.
Script Creation
To create a new script it is necessary to perform the following steps:
- click with right mouse button on Scripts section and select Create New in the context menu;
- define script’s parameters in Script window:
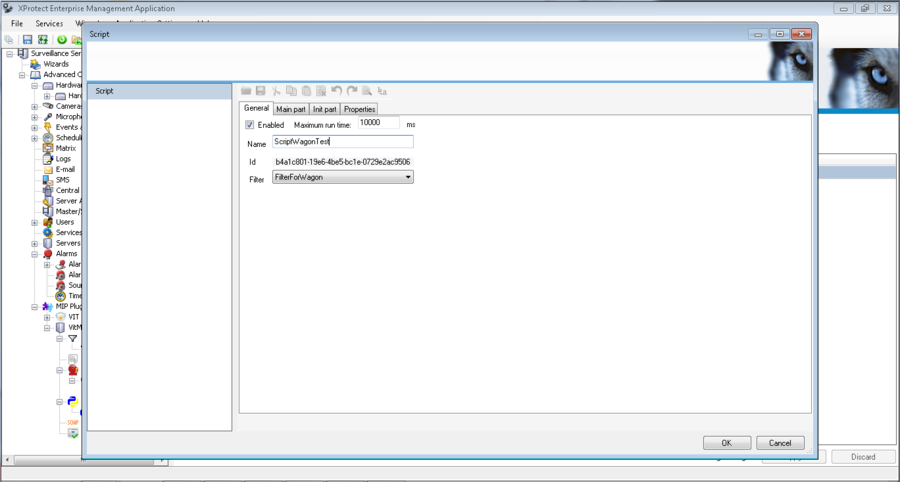
- paste script’s general parameters on General tab (see fig. VitMLXP Gateway. General parameters management):
- Enabled - flag in this field defines if the script available for usage;
- Maximum run time – the maximum time for script to be executed. If script didn’t finished its work for the specified time the execution will be terminated;
- Name – script’s name;
- Filter – drop list with the filters that are available in the system. Defines events that will be processed by script;
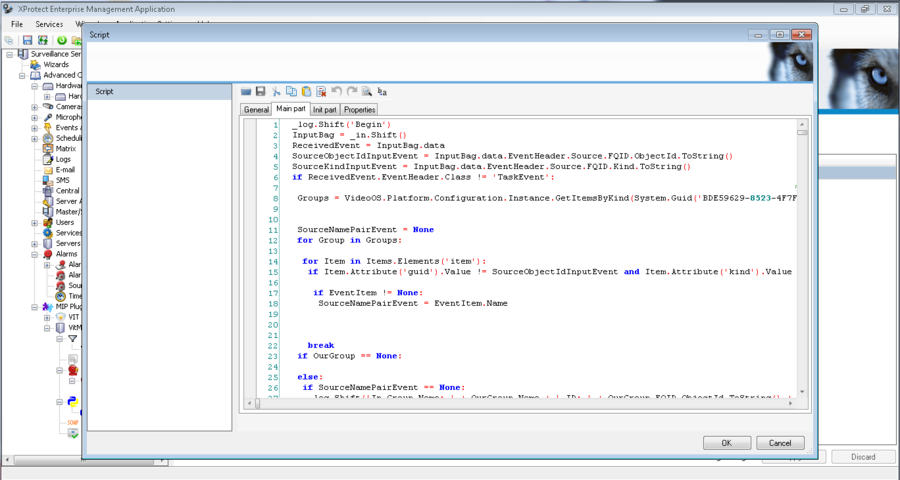
- put script’s body on Main part tab (see fig. VitMLXP Gateway. Script’s body input).
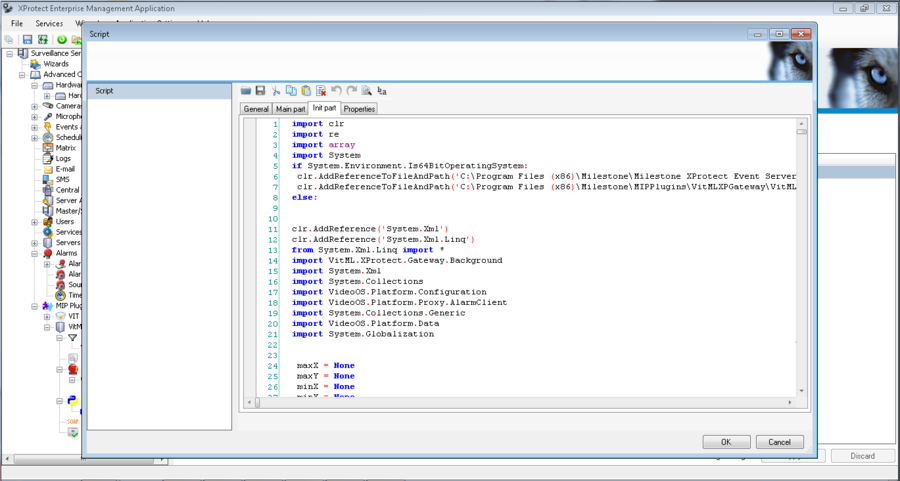
- declare variables and libraries on Init part tab (see fig. VitMLXP Gateway. Script’s variables input);
- define value of script’s variables on Parameters tab;
- press Save button on Milestone Management Application control panel.
Writing a script
Scripts for VitMLXP Gateway can be provided by VIT Company (depending on selected business pack) or created independently by user.
Scripts are the programs on Python. IronPython is used, it’s an implementation for .net Framework platform. It means that except Python’s standard features, types of .net Framework can be used in scripts – as from standard classes library, as created by user.
The following variables must be created before the scripts runs:
- _GLOBAL stores vocabulary with the following keys:
- home type string – the root directory of the plugin;
- class type string – plugin’s name of class;
- version type string - plugin’s version;
- id type string - plugin’s id;
- memo type string – for future usage;
- _ARGV vocabulary type string\string - for future usage;
- _me type string – script’s id;
- _clr type string[] – full path to assembles of .net environment, that must be loaded;
- _in calls shift() – return the input objects of BagIn class subsequently;
- _out through calls shift() – receives the output objects of BagOut class;
- _log through calls:
- public void shift (string Body);
- public void shift (LogSeverity Severity, string Body);
- public void shift (string Facility, LogSeverity Severity, string Body) writing to log file is made.
Information about Severity Levels listed in table Severity Levels.
| ID | Severity | Key | Description |
|---|---|---|---|
| 0 | Emergency | emerg (panic) | System is unusable |
| 1 | Alert | alert | System requires immediate attention |
| 2 | Critical | crit | Critical system’s state |
| 3 | Error | err (error) | Error messages |
| 4 | Warning | warning (warn) | Warnings about potential problems |
| 5 | Notice | notice | Messages about normal but important events |
| 6 | Informational | info | Information messages |
| 7 | Debug | debug | Debug messages |
Script receives object of BagIn class as input through variable named _in. This variable is defined and initialized by environment, so it can be called through the first operator.
Input data are transferred through the BagIn.data field. Input data are the object of one of the classes. Object’s class is defined through the field BagIn.type. Type of this field is BagType, enumeration. Script returns output through the variable named _out. This variable must contain list System.Collections.Generic.List<BagOut> that is objects of BagOut class list.
BagOut.Data field is used for outputs. Its values are similar to values of BagIn.data field, adding string. Field BagOut.Action defines the action that must be performed with the output data. Action field is an enumeration. Object’s type of BagOut.Data field must correspond to value of BagOut.Action field or no action will be performed and error message about error in the script will be added to log-file.
Script Configuration
To configure script’s parameters it is necessary to double click with left mouse button on the script’s name in Scripts table and paste script’s parameters in Script window that appear (see fig. VitMLXP Gateway. Script configuration).
Script Deletion
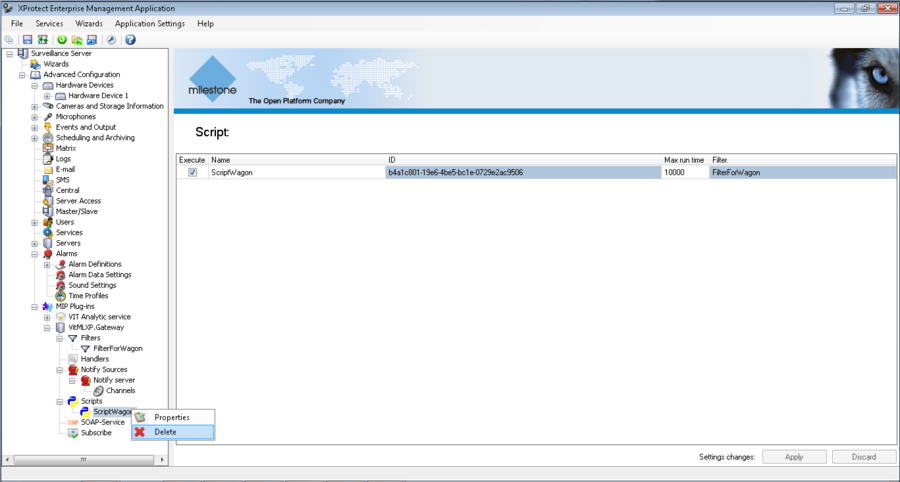
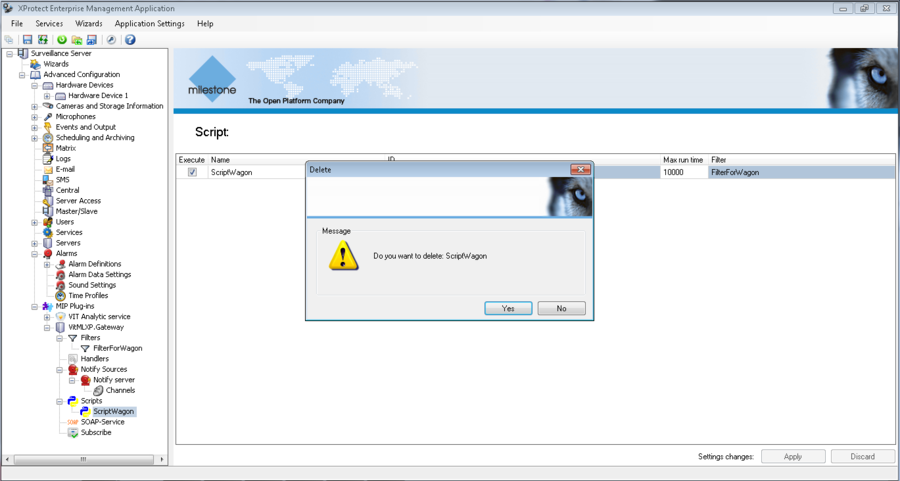
To delete existing Script it is necessary to perform the following steps:
- click with right mouse button on the name of the specified script and select Delete in the context menu (see fig. VitMLXP Gateway. Script deletion);
- confirm deletion in the pop-up window (see fig. VitMLXP Gateway. Confirmation of Script deletion).
Soap-Service
SOAP-service allows to work with VitMLXP Gateway remotely using SOAP – protocol. To get WSDL description SOAP service should send a HTTP-request to a URL that is defined in WSDL-field on Port that is define in Port field.
SOAP-Service Creation
To create a new SOAP-Service it is necessary to perform the following steps (see fig. VitMLXP Gateway. New SOAP-Service creation):
- click with right mouse button on SOAP-Service section and select Create New in the context menu;
- define SOAP-Service’s parameters in SOAP-Service window:
- On - flag in this field defines if the SOAP-Service available for usage;
- Name – name of the SOAP-Service;
- ID – SOAP-Service’s ID that generated automatically when SOAP-Service created; can’t be edited;
- Assembly – .dll, which will be used as SOAP-Service;
- Service Type – service from selected .dll, which will be used;
- press OK button to save the changes.
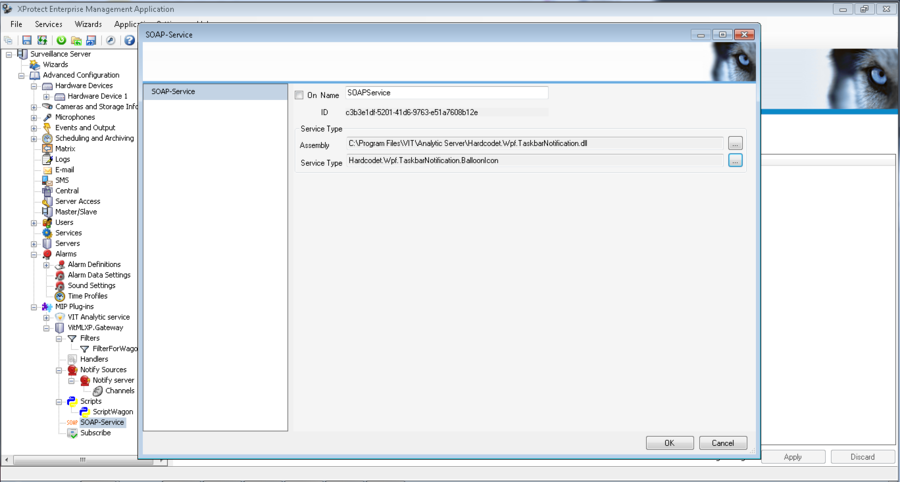
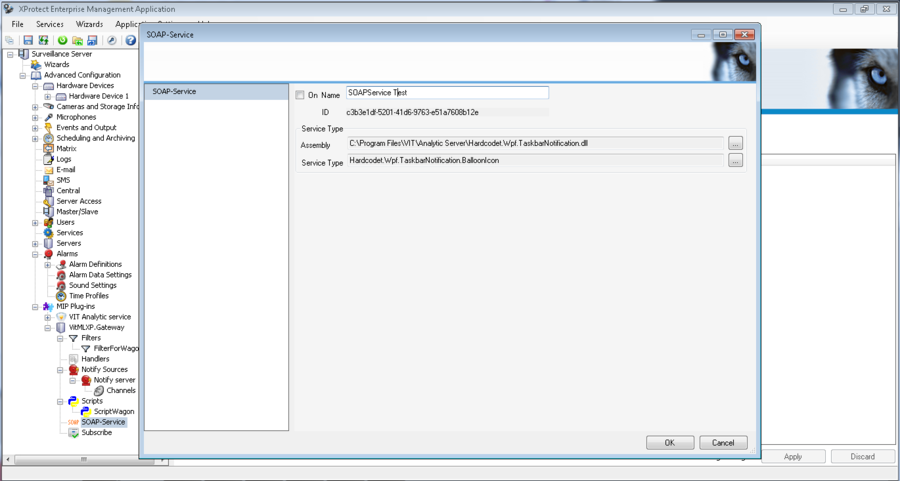
SOAP-Service Configuration
To configure SOAP-Service’s parameters it is necessary to double click with left mouse button on the SOAP-Service’s name in SOAP-Service table and paste SOAP-Service’s parameters in SOAP-Service window that appear(see fig. VitMLXP Gateway. SOAP-Service configuration).
SOAP-Service Deletion
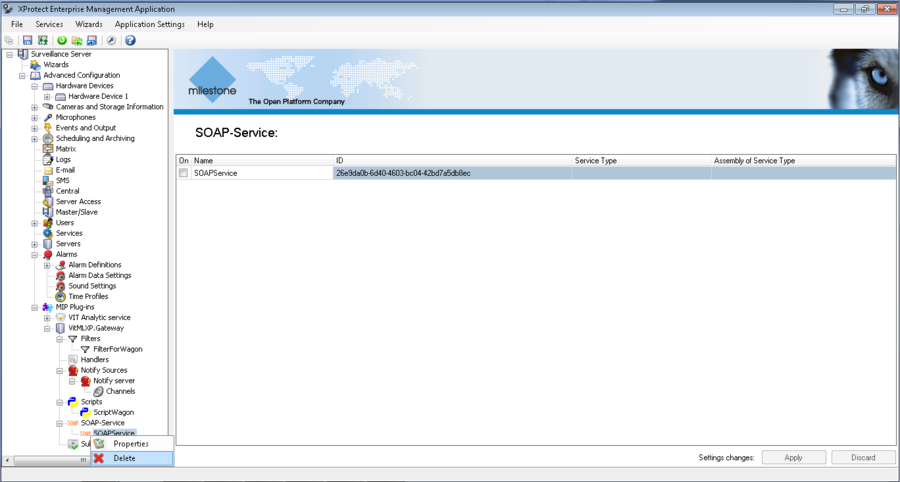
To delete existing SOAP-Service it is necessary to perform the following steps:
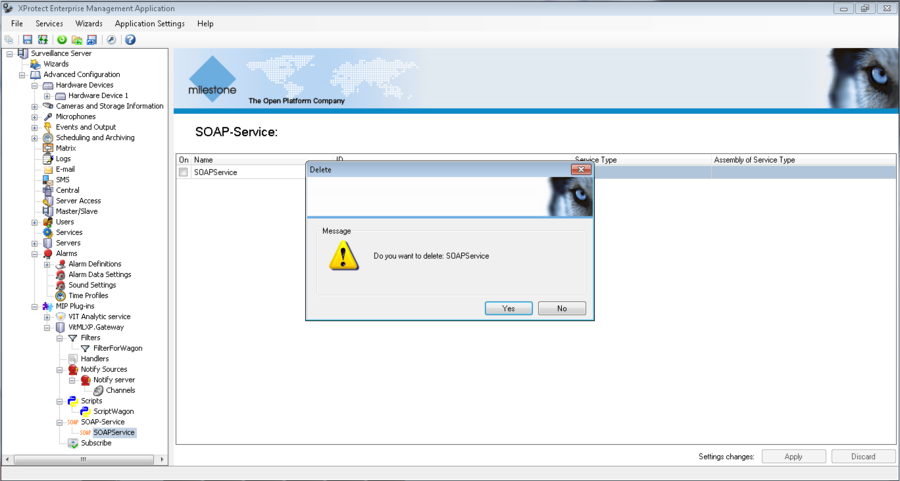
- click with right mouse button on the name of the specified SOAP-Service and select Delete in the context menu (see fig. VitMLXP Gateway. SOAP-Service deletion);
- confirm deletion in the pop-up window (see fig. VitMLXP Gateway. Confirmation of SOAP-Service deletion).
Handlers
Handlers allow to run protected scripts that were build as.dll files.
Handler Creation
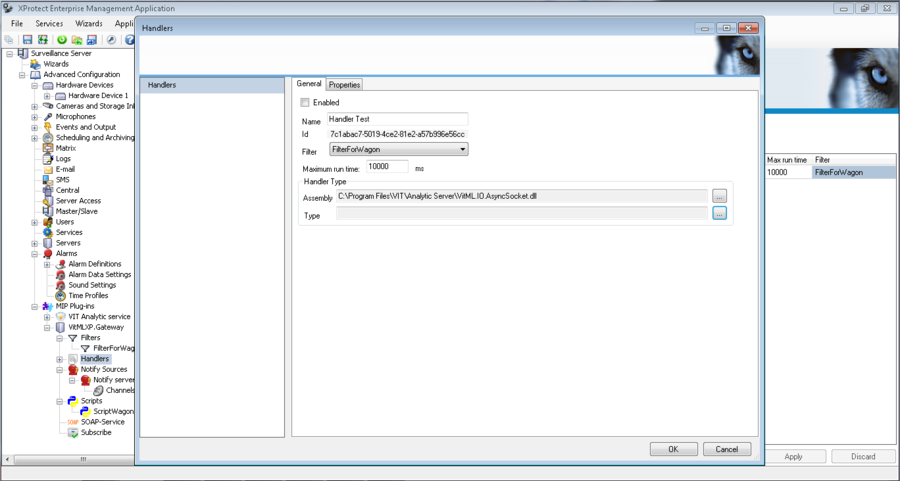
To create a new Handler it is necessary to perform the following steps (see fig. VitMLXP Gateway. New Handler creation):
- click with right mouse button on Handlers section and select Create New in the context menu;
- define Handler’s parameters in Handlers Information window:
- Enabled - flag in this field defines if the Handler available for usage;
- Name – Handler’s name;
- ID – Handler’s ID that is generated automatically when Handler created; can’t be edited;
- Filter – drop list with the filters that are available in the system. Defines events that will be processed by script;
- Maximum run time – the maximum time for script to be executed. If script didn’t finished its work for the specified time the execution will be terminated;
- Assembly – dll, which will be used as script;
- Service Type – service from selected .dll, which will be used;
- press OK button to save the changes.
Handler Configuration
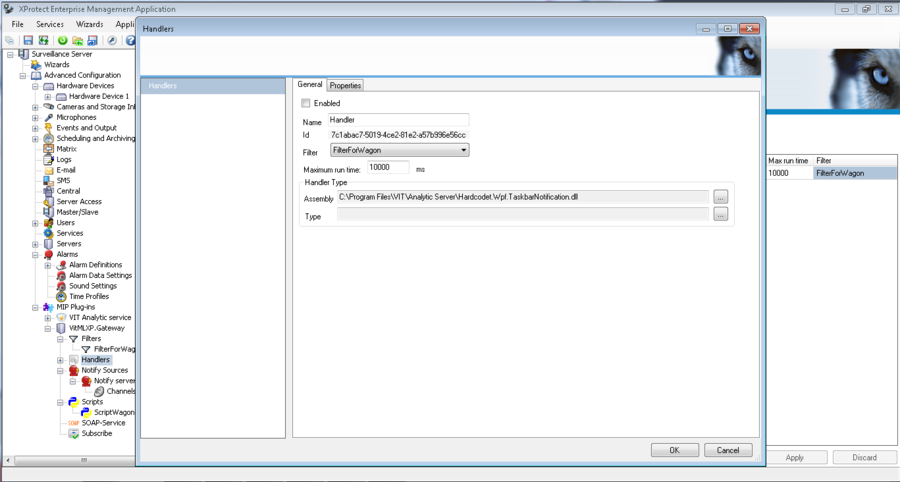
To configure Handler’s parameters it is necessary to double click with left mouse button on the Handler’s name in Handlers table and paste Handler’s parameters in Handlers window that appear (see fig. VitMLXP Gateway. Handler configuration).
Handler Deletion
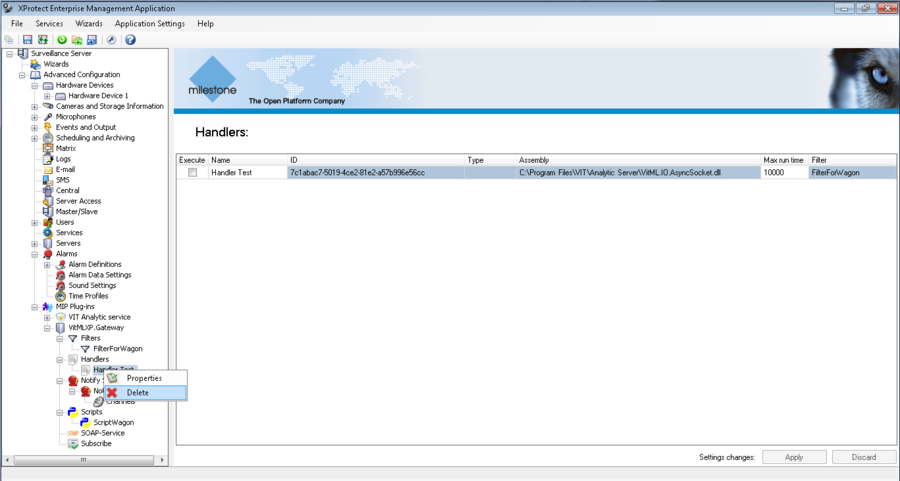
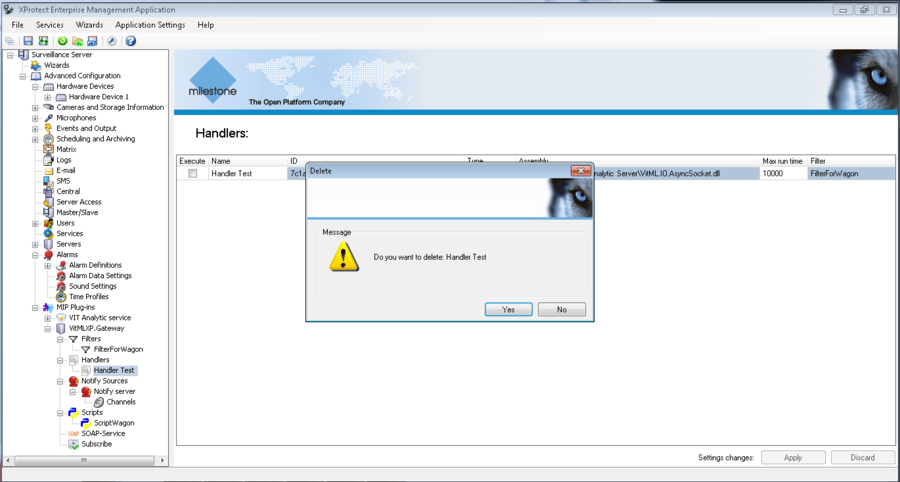
To delete existing Handler it is necessary to perform the following steps:
- click with right mouse button on the name of the specified Handler and select Delete in the context menu (see fig. VitMLXP Gateway. Handler deletion);
- confirm deletion (see fig. VitMLXP Gateway. Confirmation of Handler deletion).
VitMLXP Gateway Management, Enterprise version VitMLXP Gateway Management, версия Enterprise
